> ## Documentation Index
> Fetch the complete documentation index at: https://moengage-doc-2298-s2s-type-case-sensitive.mintlify.site/llms.txt
> Use this file to discover all available pages before exploring further.

# Set up MoEngage activity in SFMC

> Install and configure MoEngage custom activities, CloudPages, and Data Extensions in Salesforce Marketing Cloud so you can use MoEngage Push and Event activities in Journey Builder.

## Introduction

This guide provides detailed instructions for setting up MoEngage Custom Activities in Salesforce Marketing Cloud (SFMC). Follow these steps to ensure a smooth integration and usage.

<Info>
  **Prerequisites**

  * Salesforce Marketing Cloud Access: Administrator and Marketing Cloud Administrator permissions are required.
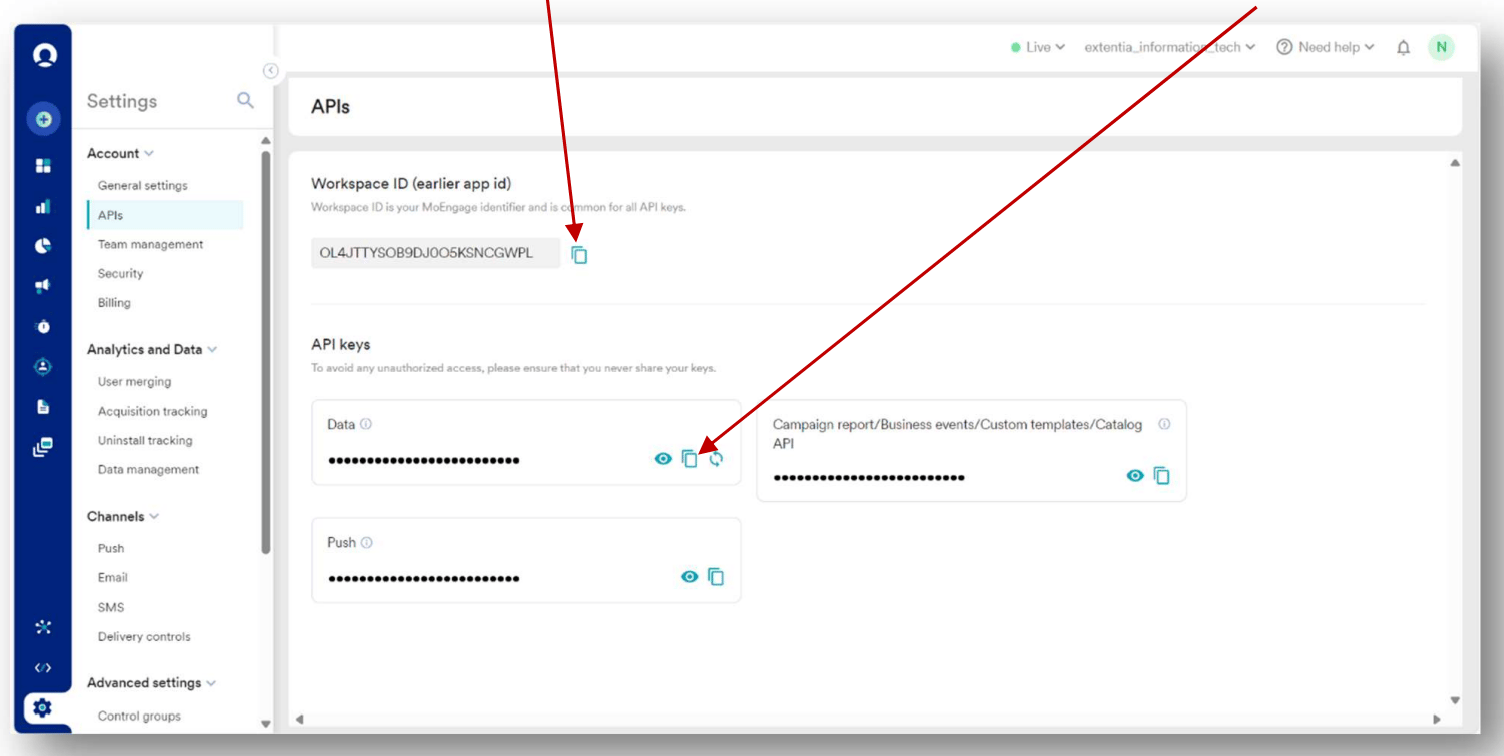
  * MoEngage API Credentials: Ensure you have access to your MoEngage APIs (Settings > Accounts > APIs).
</Info>

## Step 1: Set up MoEngage custom activity

To set up the MoEngage custom activity, perform the following steps:

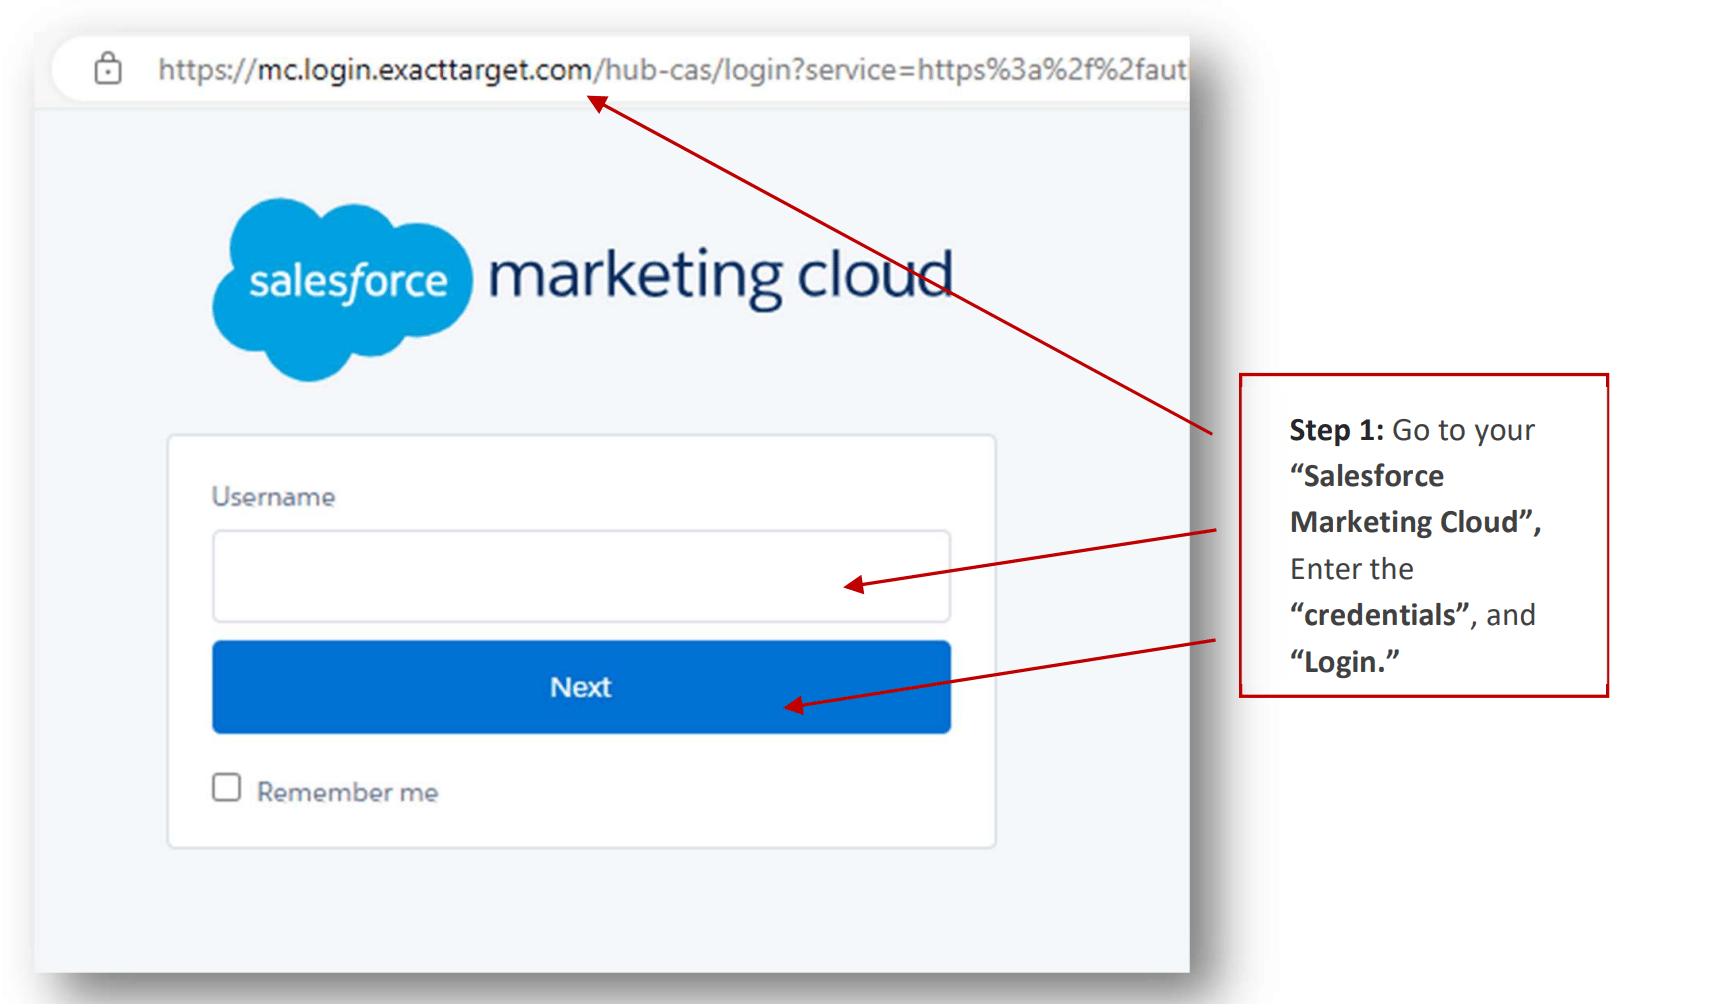
1. Log in to your Salesforce Marketing Cloud (SFMC).
   <img src="https://mintcdn.com/moengage-doc-2298-s2s-type-case-sensitive/TwBfsWYvIFdbxCDD/images/partner_36576006441364.png?fit=max&auto=format&n=TwBfsWYvIFdbxCDD&q=85&s=779d2c1f3950aba9369d17ca23494364" alt="Salesforce Marketing Cloud login screen" width="1720" height="1004" data-path="images/partner_36576006441364.png" />

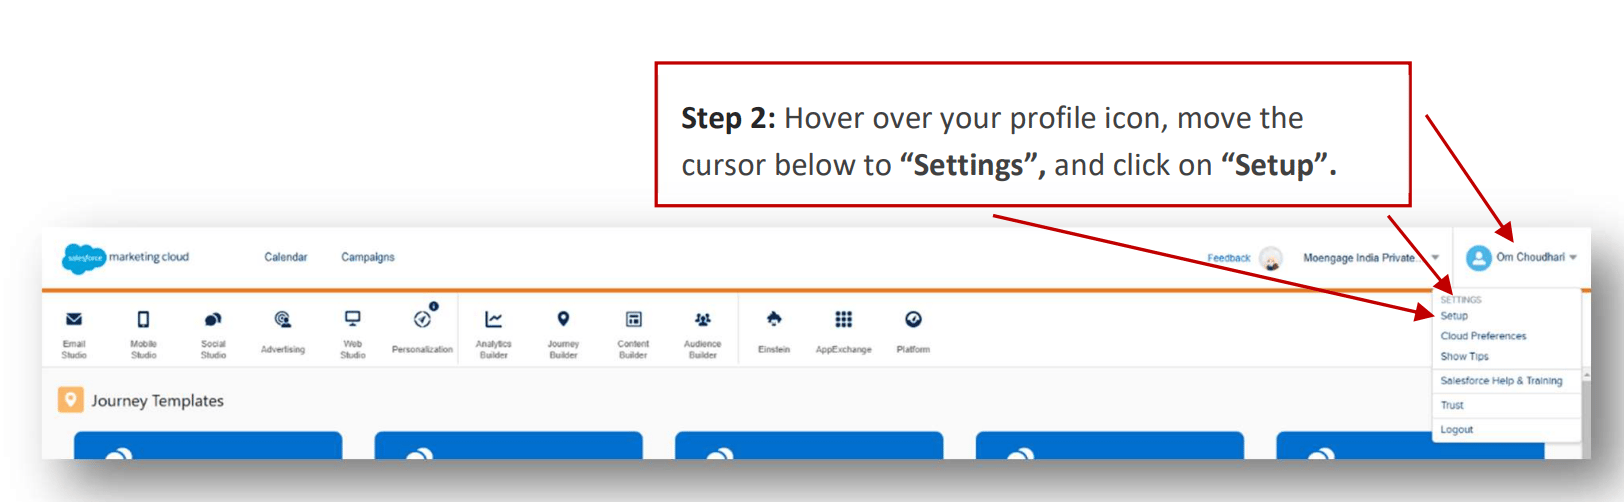
2. Access SFMC settings.

   <img src="https://mintcdn.com/moengage-doc-2298-s2s-type-case-sensitive/TwBfsWYvIFdbxCDD/images/partner_36576006441620.png?fit=max&auto=format&n=TwBfsWYvIFdbxCDD&q=85&s=5ed910563bbcfce79a0d1e0c48b7d573" alt="Accessing SFMC settings from the dashboard" width="1624" height="502" data-path="images/partner_36576006441620.png" />

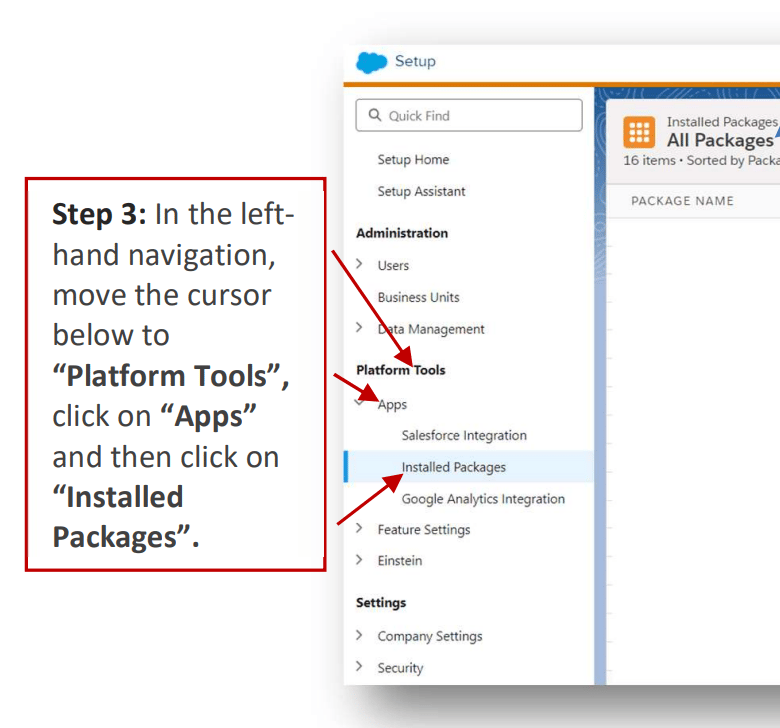
3. Once you click on "Installed Packages", this tab will be visible on the right side of the page.
   <img src="https://mintcdn.com/moengage-doc-2298-s2s-type-case-sensitive/TwBfsWYvIFdbxCDD/images/partner_36576013645972.png?fit=max&auto=format&n=TwBfsWYvIFdbxCDD&q=85&s=8907de17a0b18e68cde8b6b3b842e907" alt="Installed Packages tab in SFMC settings" width="780" height="728" data-path="images/partner_36576013645972.png" />

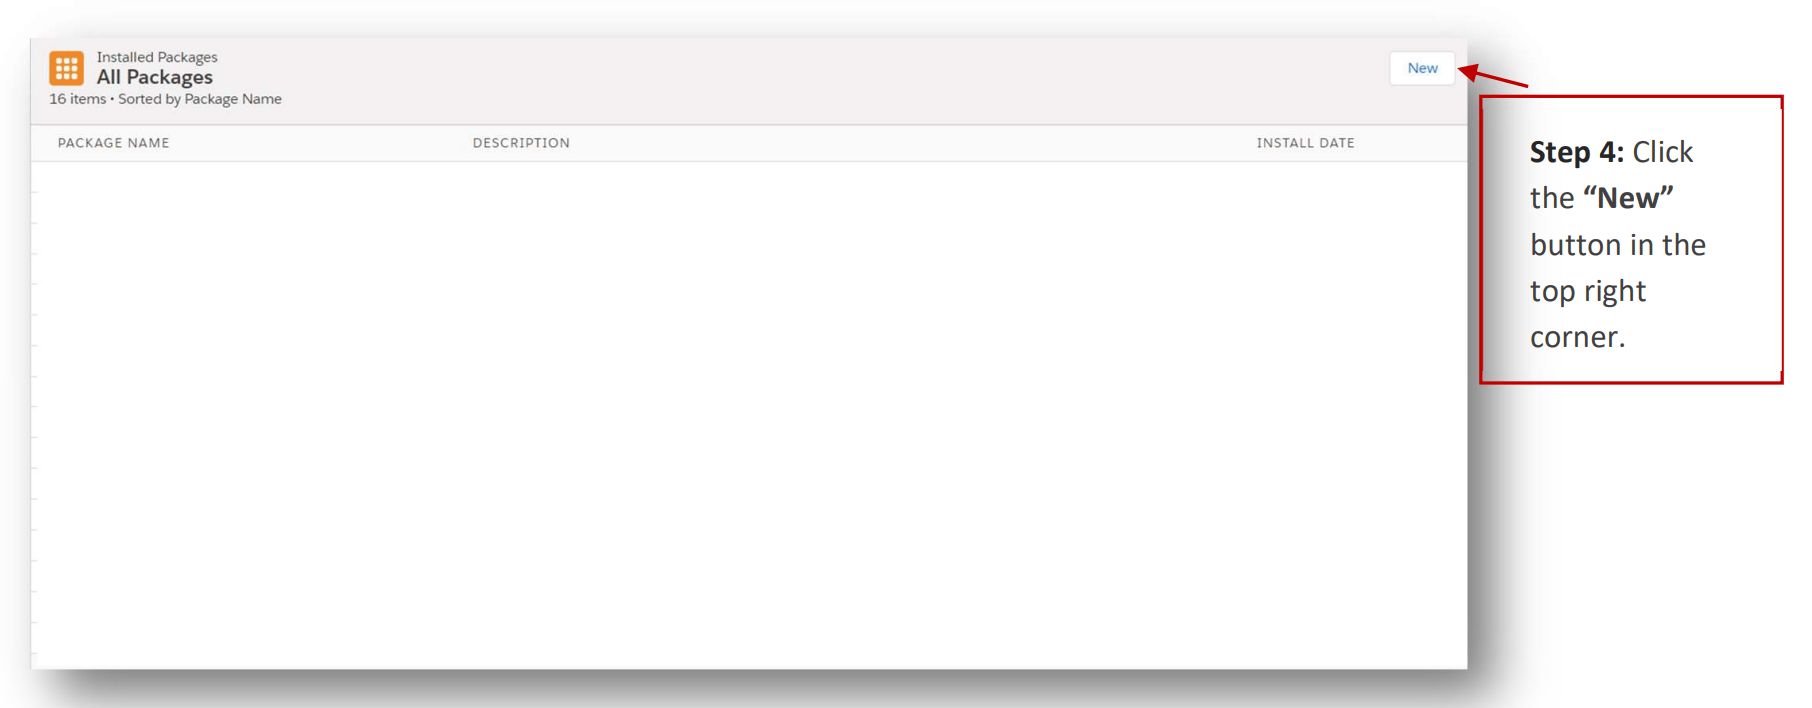
4. Create a new package.

   <img src="https://mintcdn.com/moengage-doc-2298-s2s-type-case-sensitive/TwBfsWYvIFdbxCDD/images/partner_36576013646228.png?fit=max&auto=format&n=TwBfsWYvIFdbxCDD&q=85&s=931f2d8930ee4d27e8b16eeae9df2f7e" alt="Creating a new package in SFMC Installed Packages" width="1812" height="708" data-path="images/partner_36576013646228.png" />

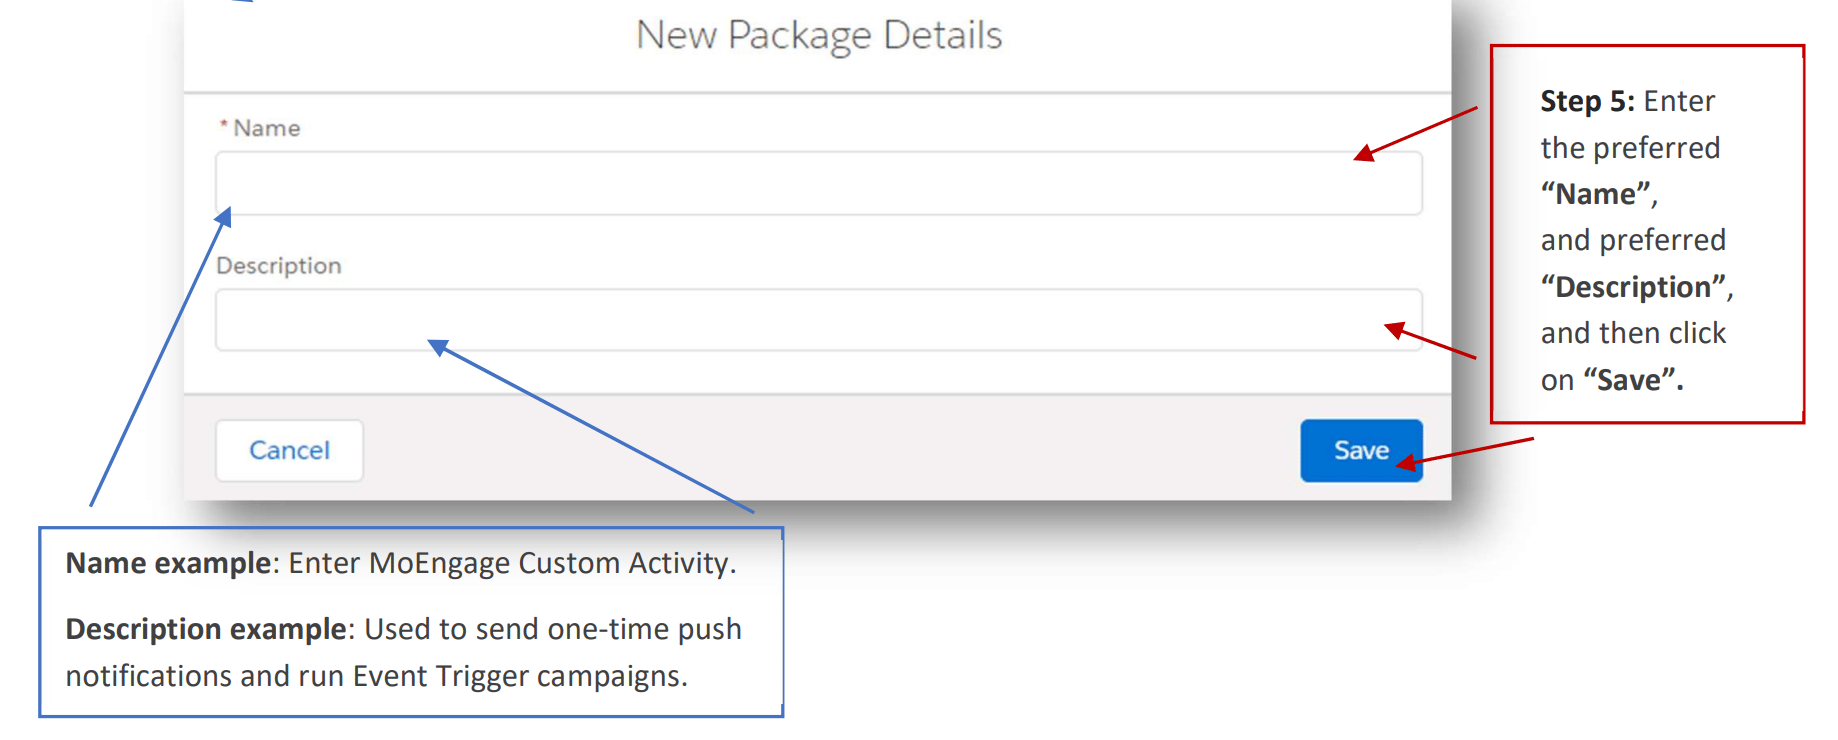
5. Add package details. You can name it "MoEngage Custom Activity" and add description as "Used to send one-time push notifications and run Event Trigger campaigns".
   <img src="https://mintcdn.com/moengage-doc-2298-s2s-type-case-sensitive/TwBfsWYvIFdbxCDD/images/partner_36576013646484.png?fit=max&auto=format&n=TwBfsWYvIFdbxCDD&q=85&s=59b3cff9d52f3b7b0fae9d10787c5abc" alt="Entering name and description for the MoEngage Custom Activity package" width="1838" height="740" data-path="images/partner_36576013646484.png" />

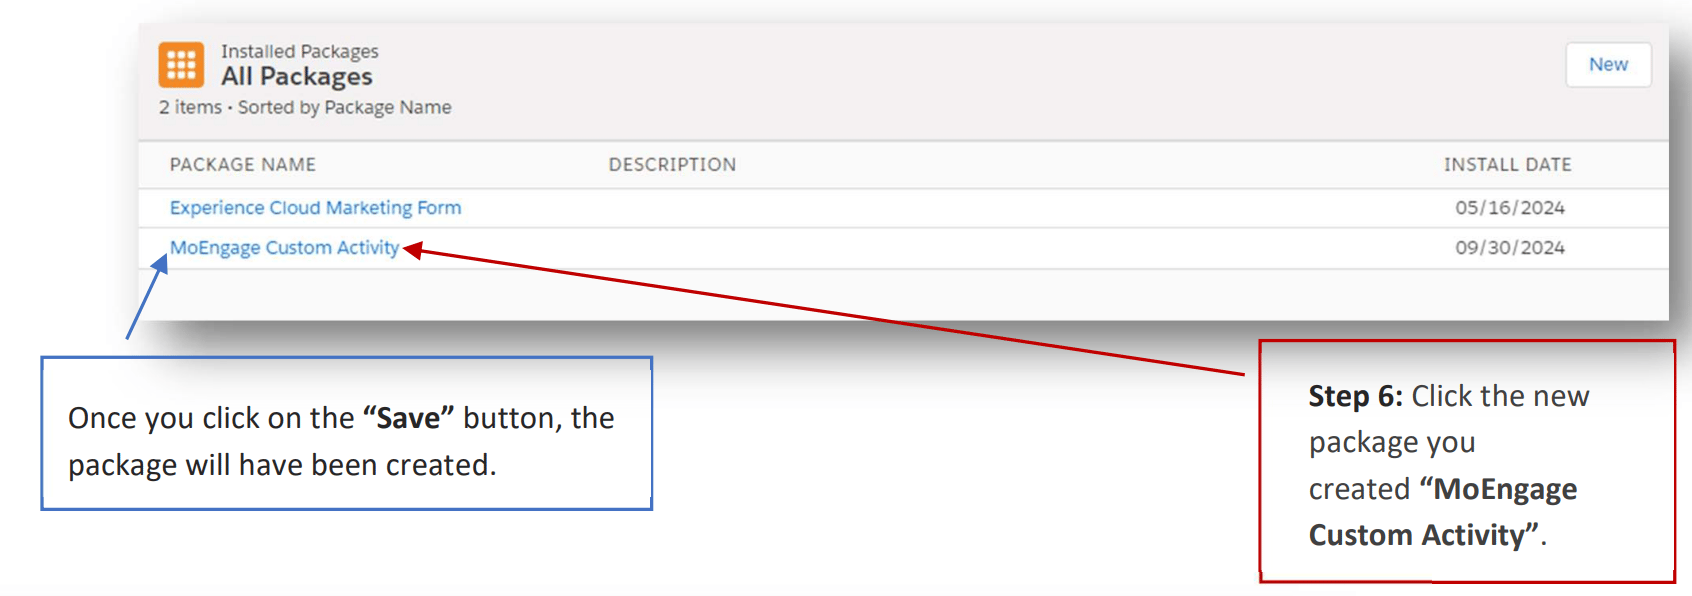
6. Add MoEngage Components.

   <img src="https://mintcdn.com/moengage-doc-2298-s2s-type-case-sensitive/TwBfsWYvIFdbxCDD/images/partner_36576006447124.png?fit=max&auto=format&n=TwBfsWYvIFdbxCDD&q=85&s=f0606a63c3ddce9f805602dd32e46634" alt="Adding MoEngage Components to the package" width="1692" height="596" data-path="images/partner_36576006447124.png" />

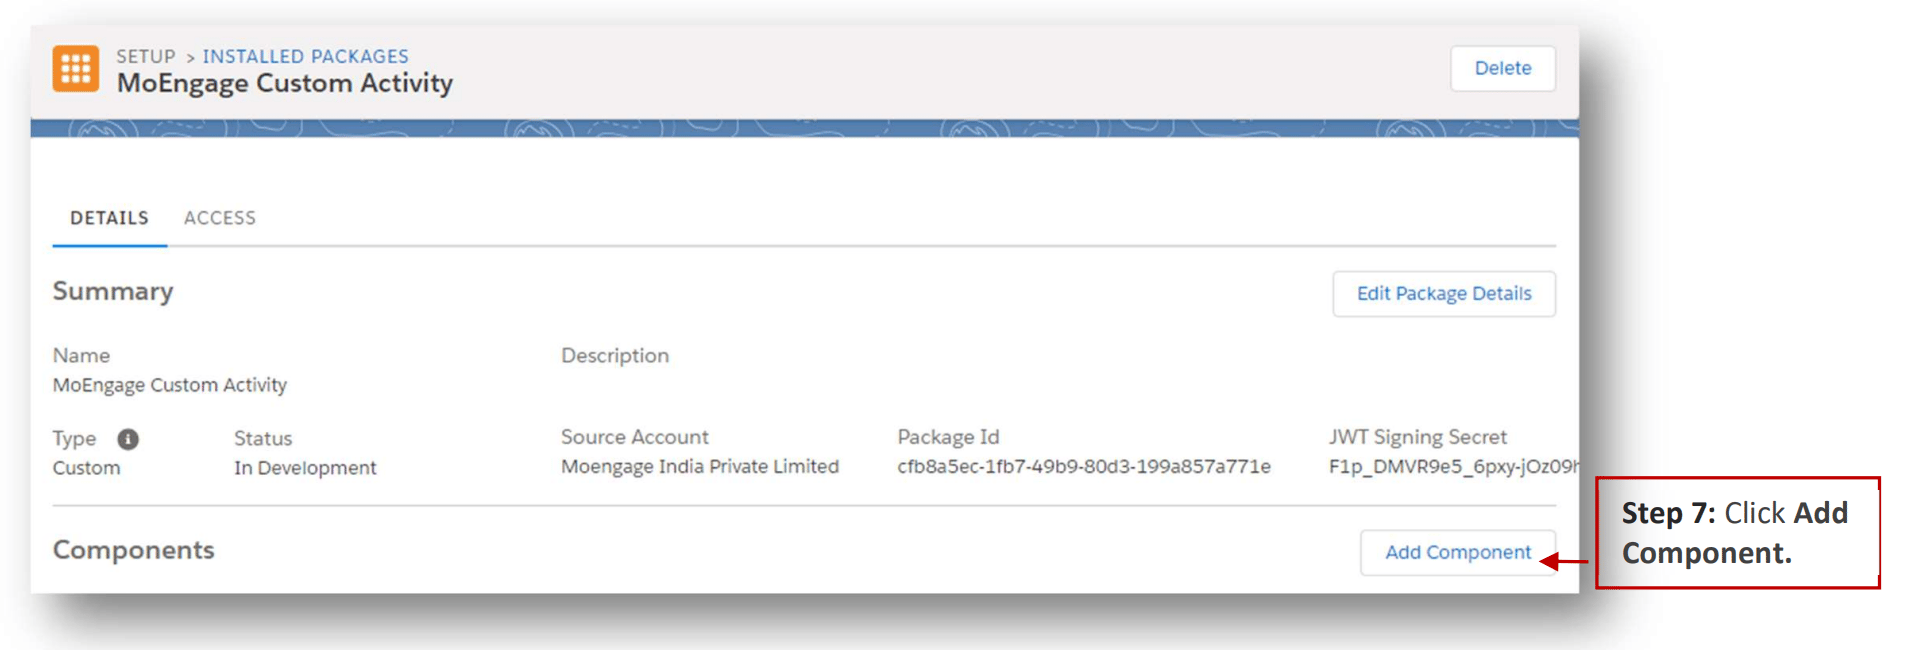
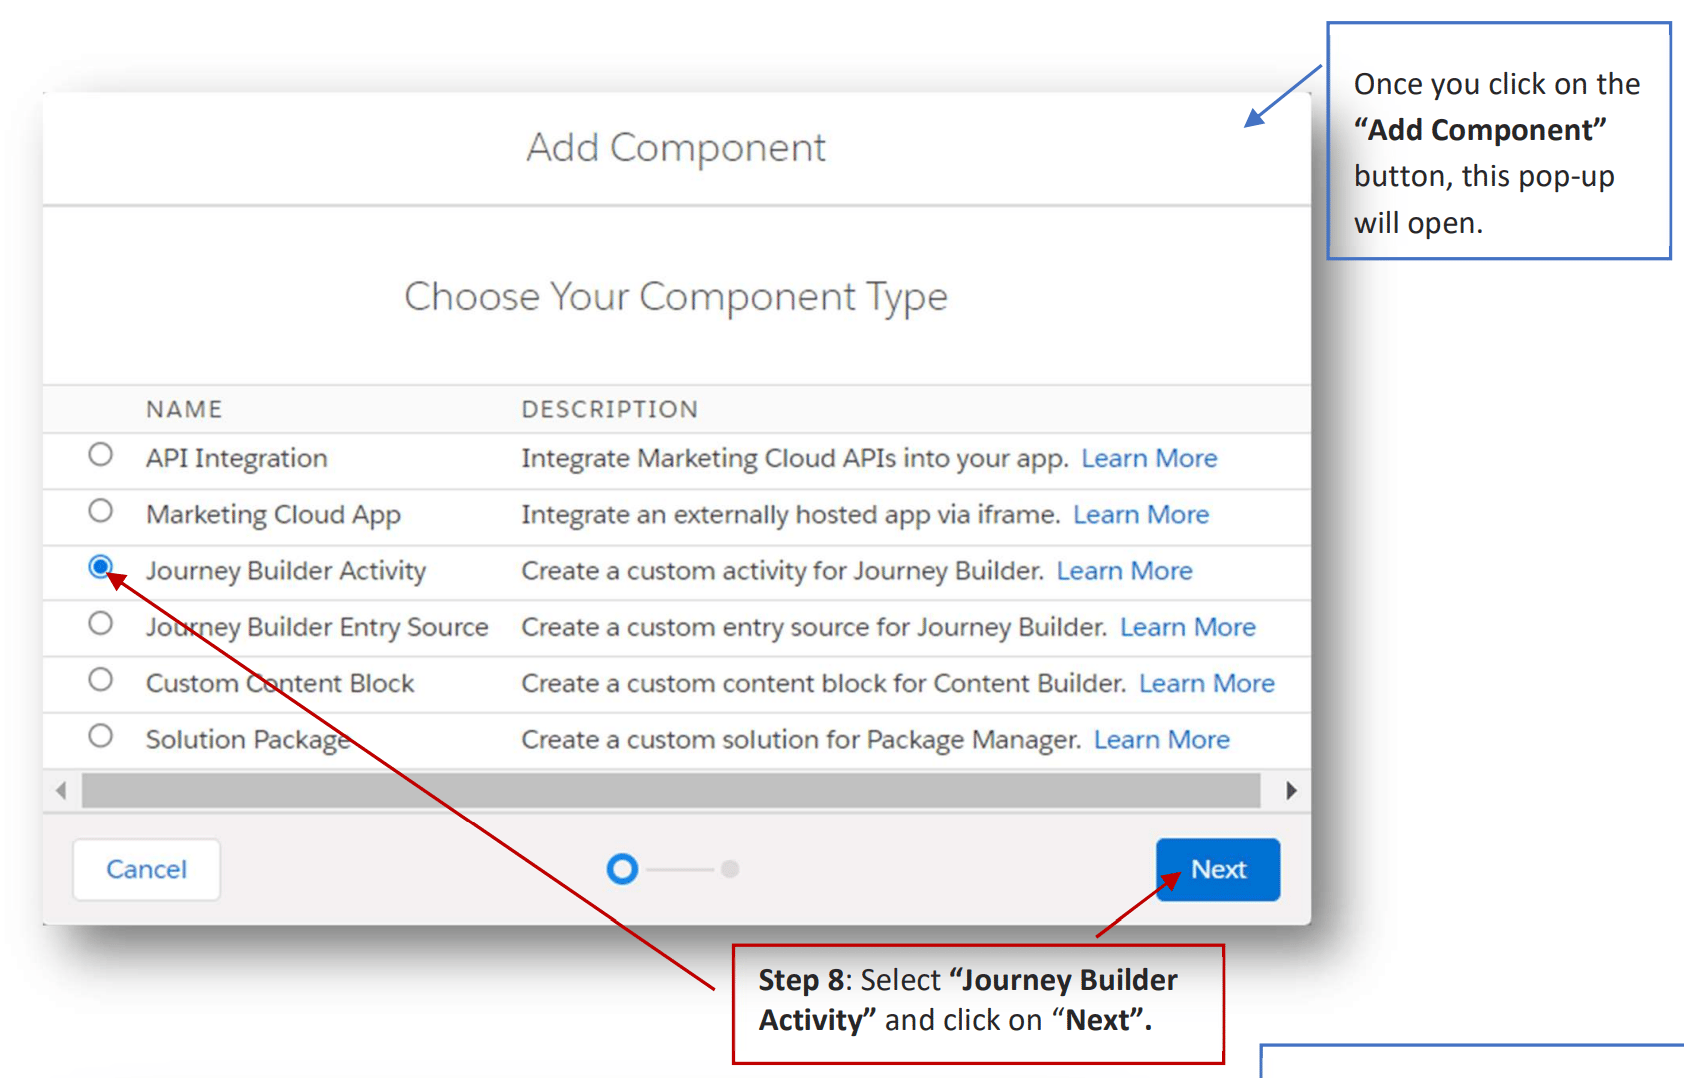
7. Click Add Component.

   <img src="https://mintcdn.com/moengage-doc-2298-s2s-type-case-sensitive/TwBfsWYvIFdbxCDD/images/partner_36576006447636.png?fit=max&auto=format&n=TwBfsWYvIFdbxCDD&q=85&s=6da3baad7a1738d3434ecd7965db65ad" alt="Add Component button in SFMC package configuration" width="1916" height="650" data-path="images/partner_36576006447636.png" />

8. Select "Journey Builder Activity" and click on "Next".
   <img src="https://mintcdn.com/moengage-doc-2298-s2s-type-case-sensitive/TwBfsWYvIFdbxCDD/images/partner_36576006447764.png?fit=max&auto=format&n=TwBfsWYvIFdbxCDD&q=85&s=33e9f1909333abdbd932a2c2659e7233" alt="Selecting Journey Builder Activity as the component type" width="1684" height="1078" data-path="images/partner_36576006447764.png" />

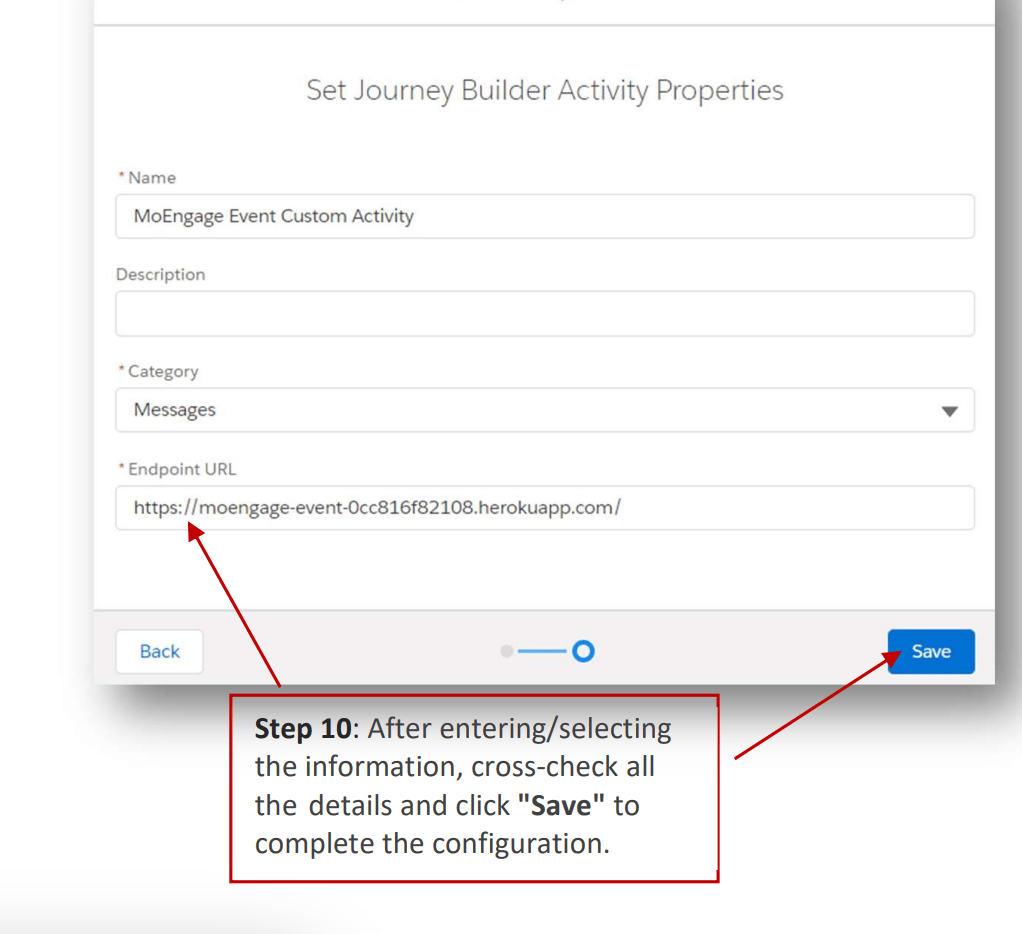
9. Click Save.

10. Repeat the same steps for MoEngage Event Destination.
    <img src="https://mintcdn.com/moengage-doc-2298-s2s-type-case-sensitive/TwBfsWYvIFdbxCDD/images/partner_36576013650708.png?fit=max&auto=format&n=TwBfsWYvIFdbxCDD&q=85&s=268d1dcedf608f0ee781eefd0ee6b999" alt="Adding MoEngage Event Destination component" width="1022" height="934" data-path="images/partner_36576013650708.png" />

## Step 2: Set up the Cloud Page and the Data Extension

You need to set up a cloud page along with a data extension to capture the MoEngage workspace details. These can then be used while configuring a MoEngage destination in Journey Builder:

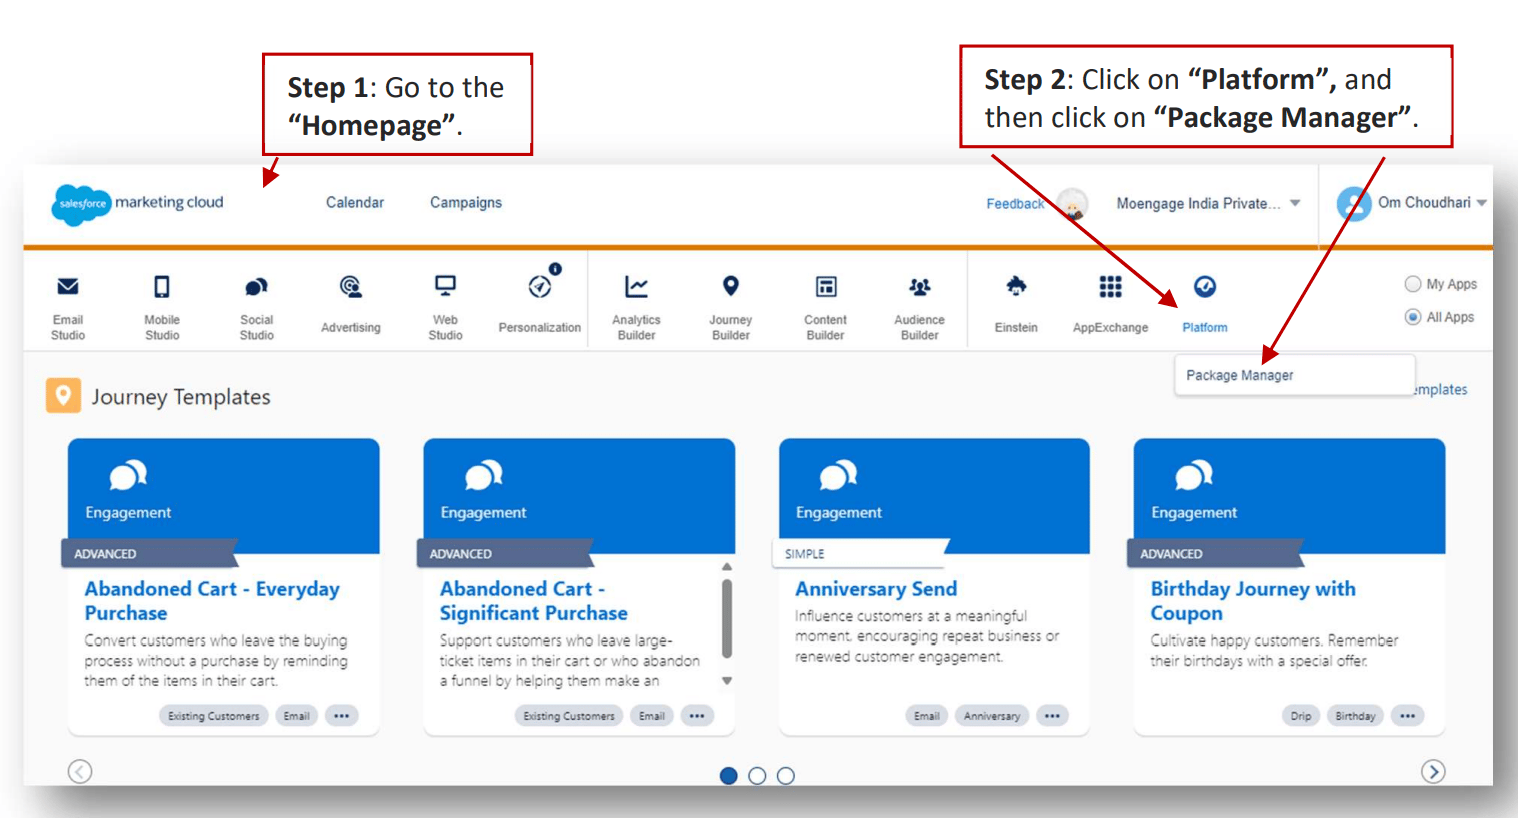
1. Navigate to the SFMC Home page.

2. Click "Platform" > "Package Manager".
   <img src="https://mintcdn.com/moengage-doc-2298-s2s-type-case-sensitive/TwBfsWYvIFdbxCDD/images/partner_36576006448404.png?fit=max&auto=format&n=TwBfsWYvIFdbxCDD&q=85&s=acd1a516858b643203433e5b7e9992b9" alt="Navigating to Platform > Package Manager in SFMC" data-og-width="1518" width="1518" data-og-height="818" height="818" data-path="images/partner_36576006448404.png" data-optimize="true" data-opv="3" srcset="https://mintcdn.com/moengage-doc-2298-s2s-type-case-sensitive/TwBfsWYvIFdbxCDD/images/partner_36576006448404.png?w=280&fit=max&auto=format&n=TwBfsWYvIFdbxCDD&q=85&s=21078842e1c193bfb7438704bb5926ab 280w, https://mintcdn.com/moengage-doc-2298-s2s-type-case-sensitive/TwBfsWYvIFdbxCDD/images/partner_36576006448404.png?w=560&fit=max&auto=format&n=TwBfsWYvIFdbxCDD&q=85&s=250c60a7b75254adcedaf6485cee4952 560w, https://mintcdn.com/moengage-doc-2298-s2s-type-case-sensitive/TwBfsWYvIFdbxCDD/images/partner_36576006448404.png?w=840&fit=max&auto=format&n=TwBfsWYvIFdbxCDD&q=85&s=3b8f753e47074c4c3a6e183a1e54b6e1 840w, https://mintcdn.com/moengage-doc-2298-s2s-type-case-sensitive/TwBfsWYvIFdbxCDD/images/partner_36576006448404.png?w=1100&fit=max&auto=format&n=TwBfsWYvIFdbxCDD&q=85&s=7af99bde43db6577a90951ec7e83860d 1100w, https://mintcdn.com/moengage-doc-2298-s2s-type-case-sensitive/TwBfsWYvIFdbxCDD/images/partner_36576006448404.png?w=1650&fit=max&auto=format&n=TwBfsWYvIFdbxCDD&q=85&s=95a645ef6cdeeeb53eca5a44c0954abf 1650w, https://mintcdn.com/moengage-doc-2298-s2s-type-case-sensitive/TwBfsWYvIFdbxCDD/images/partner_36576006448404.png?w=2500&fit=max&auto=format&n=TwBfsWYvIFdbxCDD&q=85&s=97551ce7100fd0d8246f15e77bec3b30 2500w" />

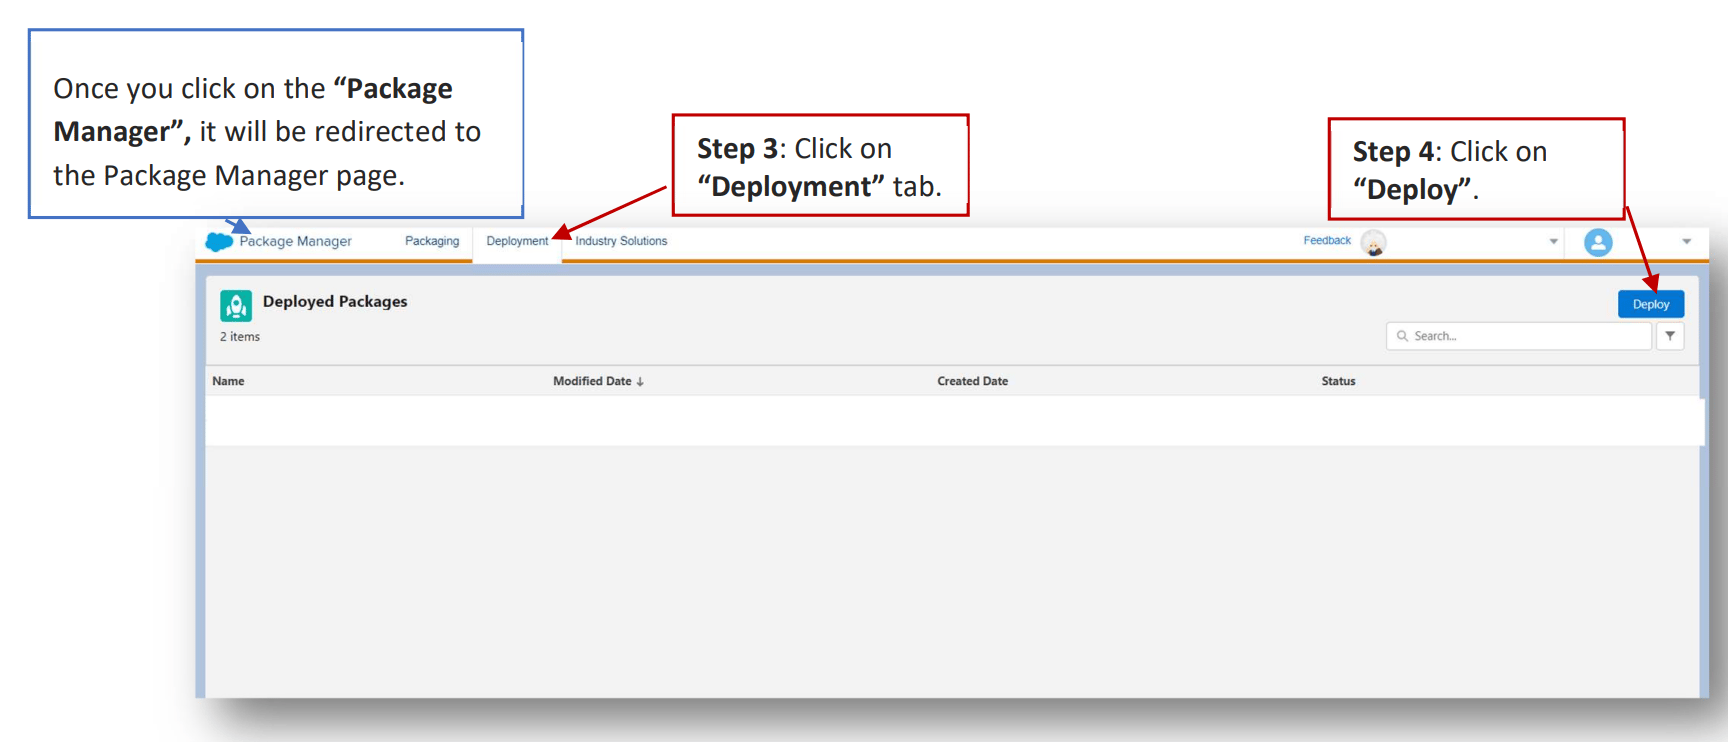
   Once you click on the "Package Manager", it will be redirected to the Package Manager page.

3. Click on the "Deployment" tab.

4. Click "Deploy".
   <img src="https://mintcdn.com/moengage-doc-2298-s2s-type-case-sensitive/TwBfsWYvIFdbxCDD/images/partner_36576013651476.png?fit=max&auto=format&n=TwBfsWYvIFdbxCDD&q=85&s=1bf4b19bd4065007ab0f63d1468f082b" alt="Deployment tab and Deploy button in Package Manager" width="1728" height="742" data-path="images/partner_36576013651476.png" />

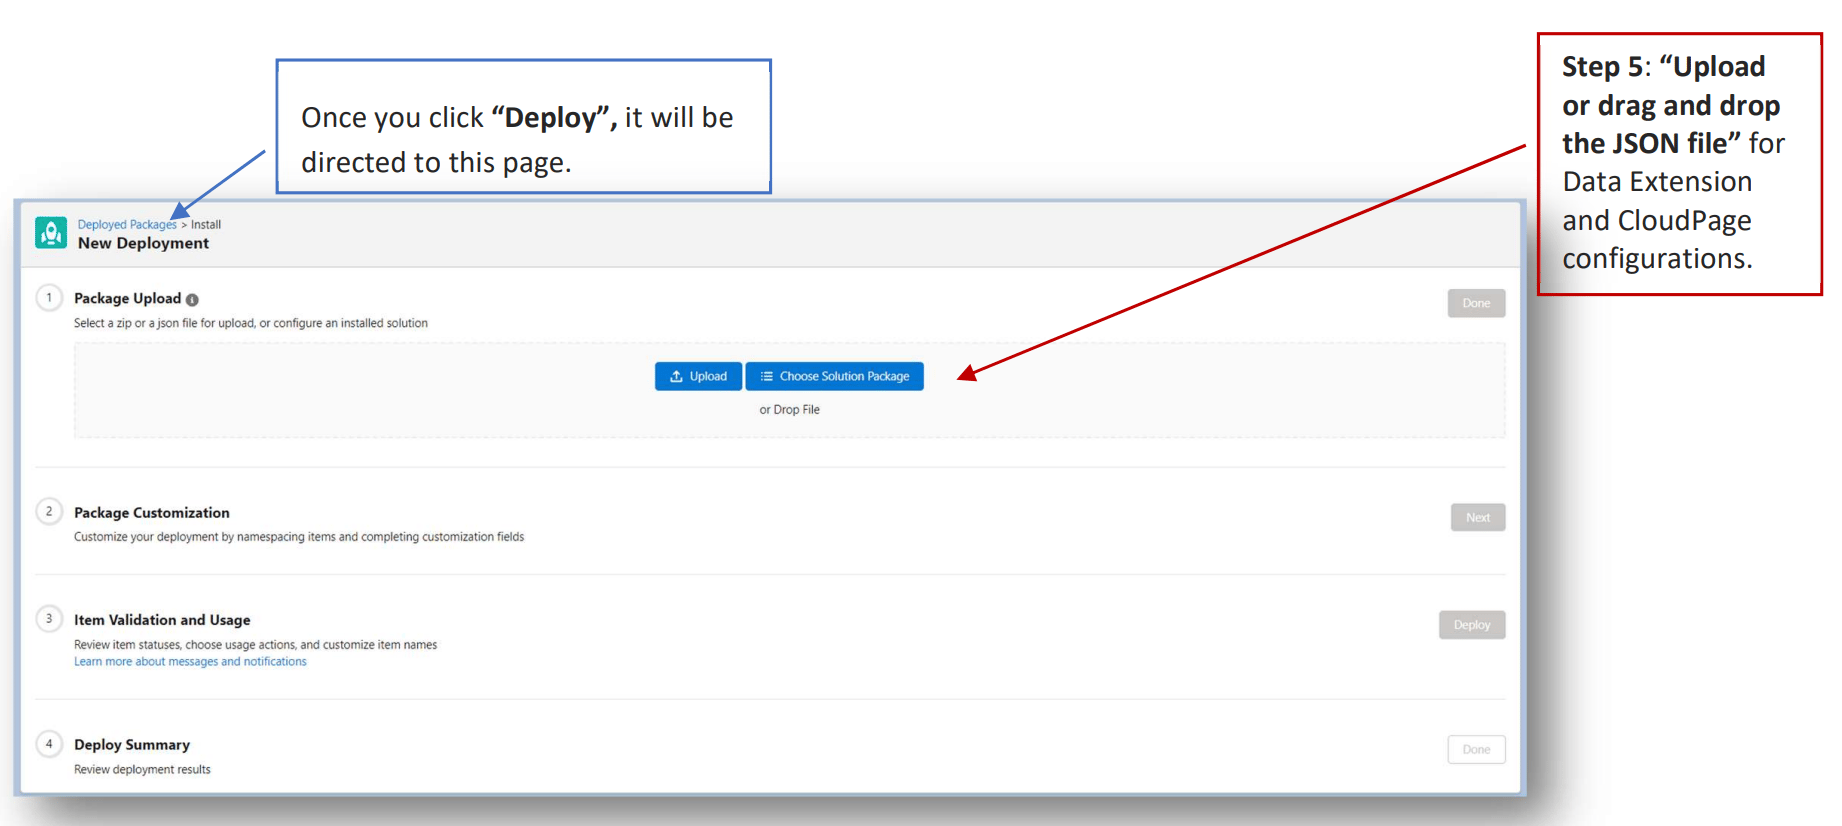
5. Upload the MoEngage solution package [JSON file](https://partners.moengage.com/hc/en-us/article_attachments/45740967830932).
   <img src="https://mintcdn.com/moengage-doc-2298-s2s-type-case-sensitive/TwBfsWYvIFdbxCDD/images/partner_36576013651860.png?fit=max&auto=format&n=TwBfsWYvIFdbxCDD&q=85&s=97342d743b27404dd61025c35db729a5" alt="Uploading the MoEngage solution package JSON" width="1842" height="826" data-path="images/partner_36576013651860.png" />

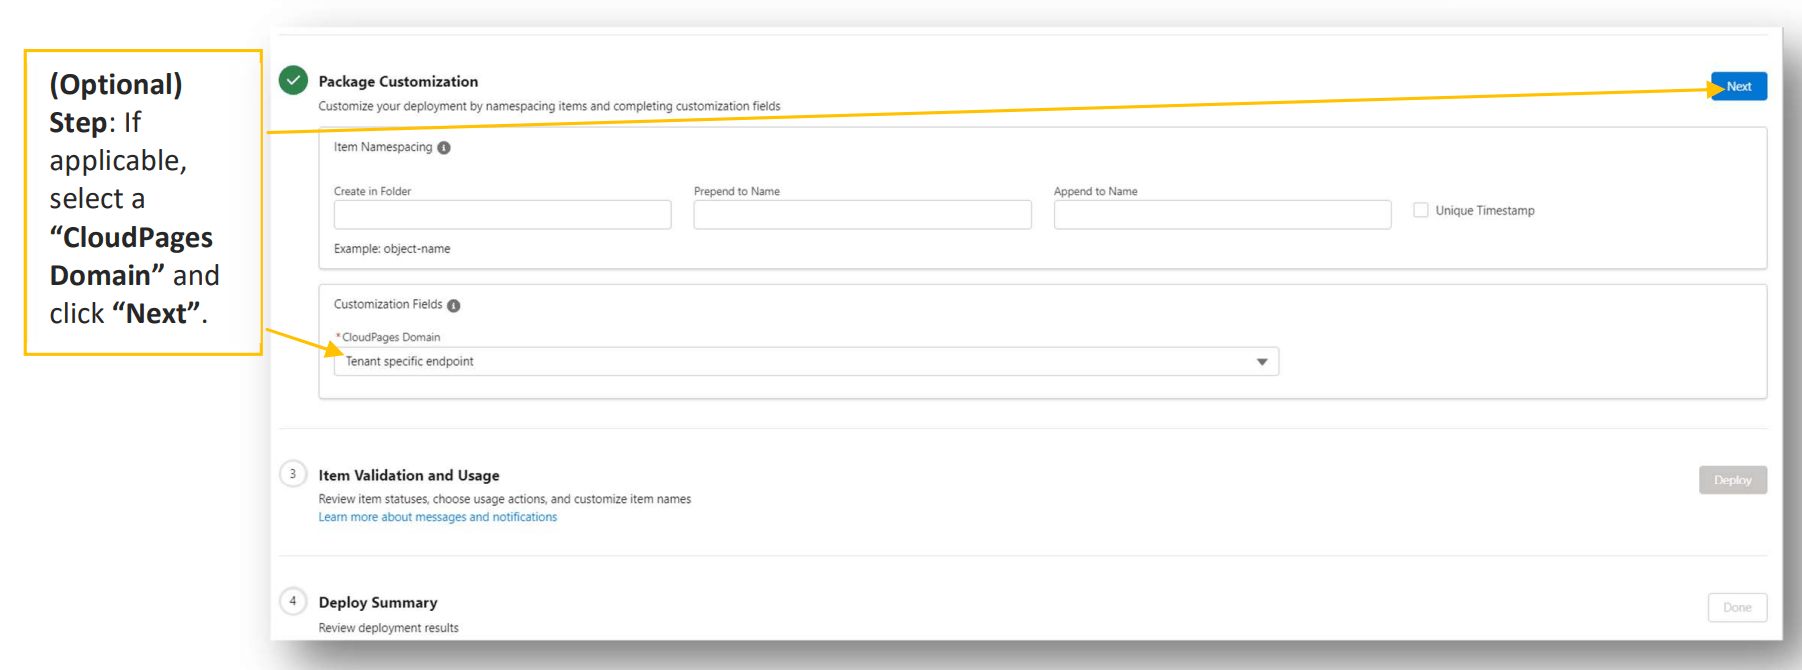
   \[Optional] If applicable, select a "CloudPages Domain" and click "Next".
   <img src="https://mintcdn.com/moengage-doc-2298-s2s-type-case-sensitive/TwBfsWYvIFdbxCDD/images/partner_36576006449428.png?fit=max&auto=format&n=TwBfsWYvIFdbxCDD&q=85&s=ab2c344f6c489a4694ff6f0c97f8af88" alt="Selecting an optional CloudPages Domain during deployment" width="1802" height="670" data-path="images/partner_36576006449428.png" />

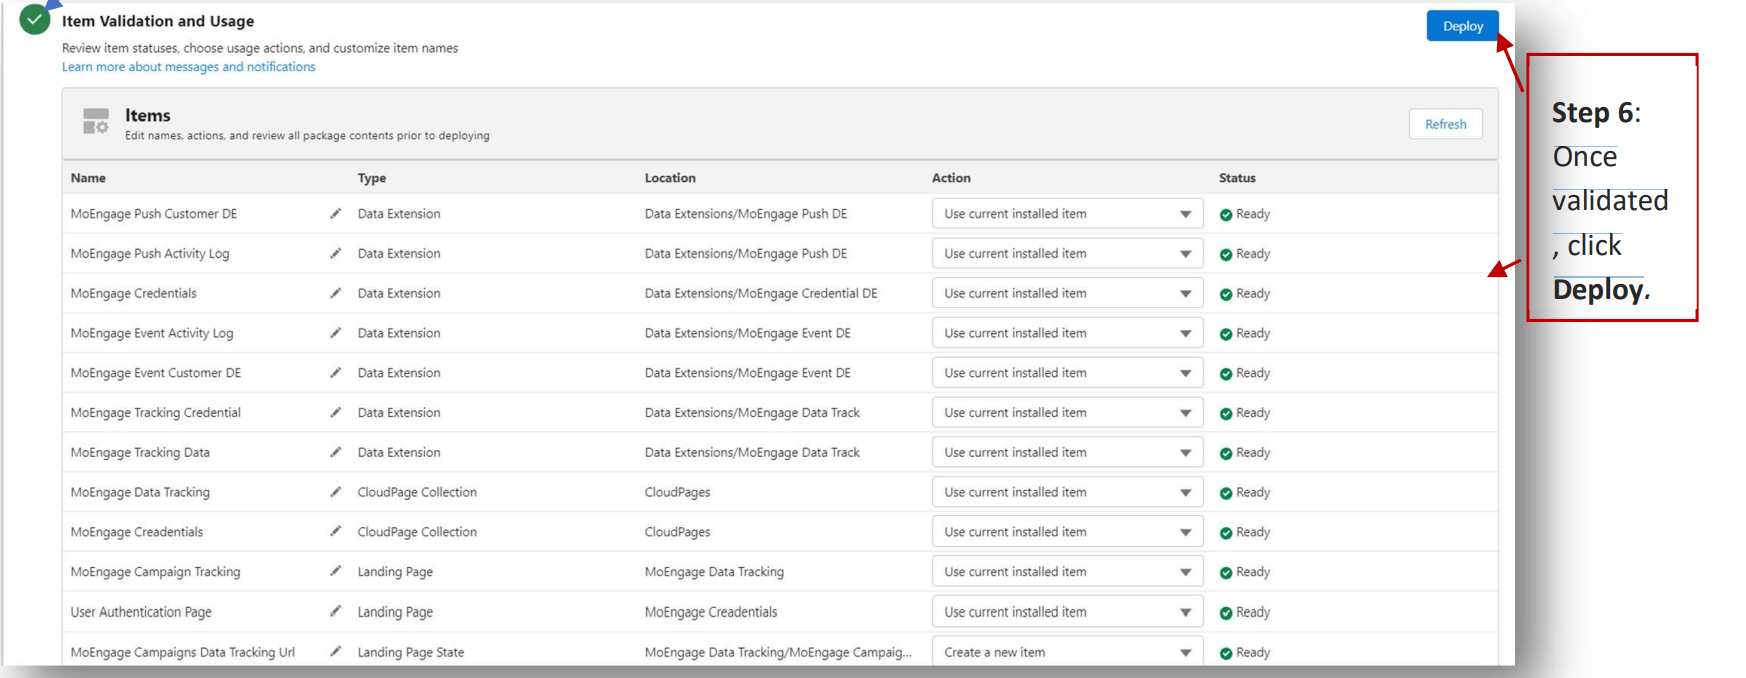
6. The system will validate the setup and check for any issues. Once validated, click Deploy.
   <img src="https://mintcdn.com/moengage-doc-2298-s2s-type-case-sensitive/TwBfsWYvIFdbxCDD/images/partner_36576006449556.png?fit=max&auto=format&n=TwBfsWYvIFdbxCDD&q=85&s=fd59281a3ab324820436080abdfe4bd1" alt="Validating and clicking Deploy in Package Manager" width="1746" height="678" data-path="images/partner_36576006449556.png" />

### Publish Data Extensions and CloudPages

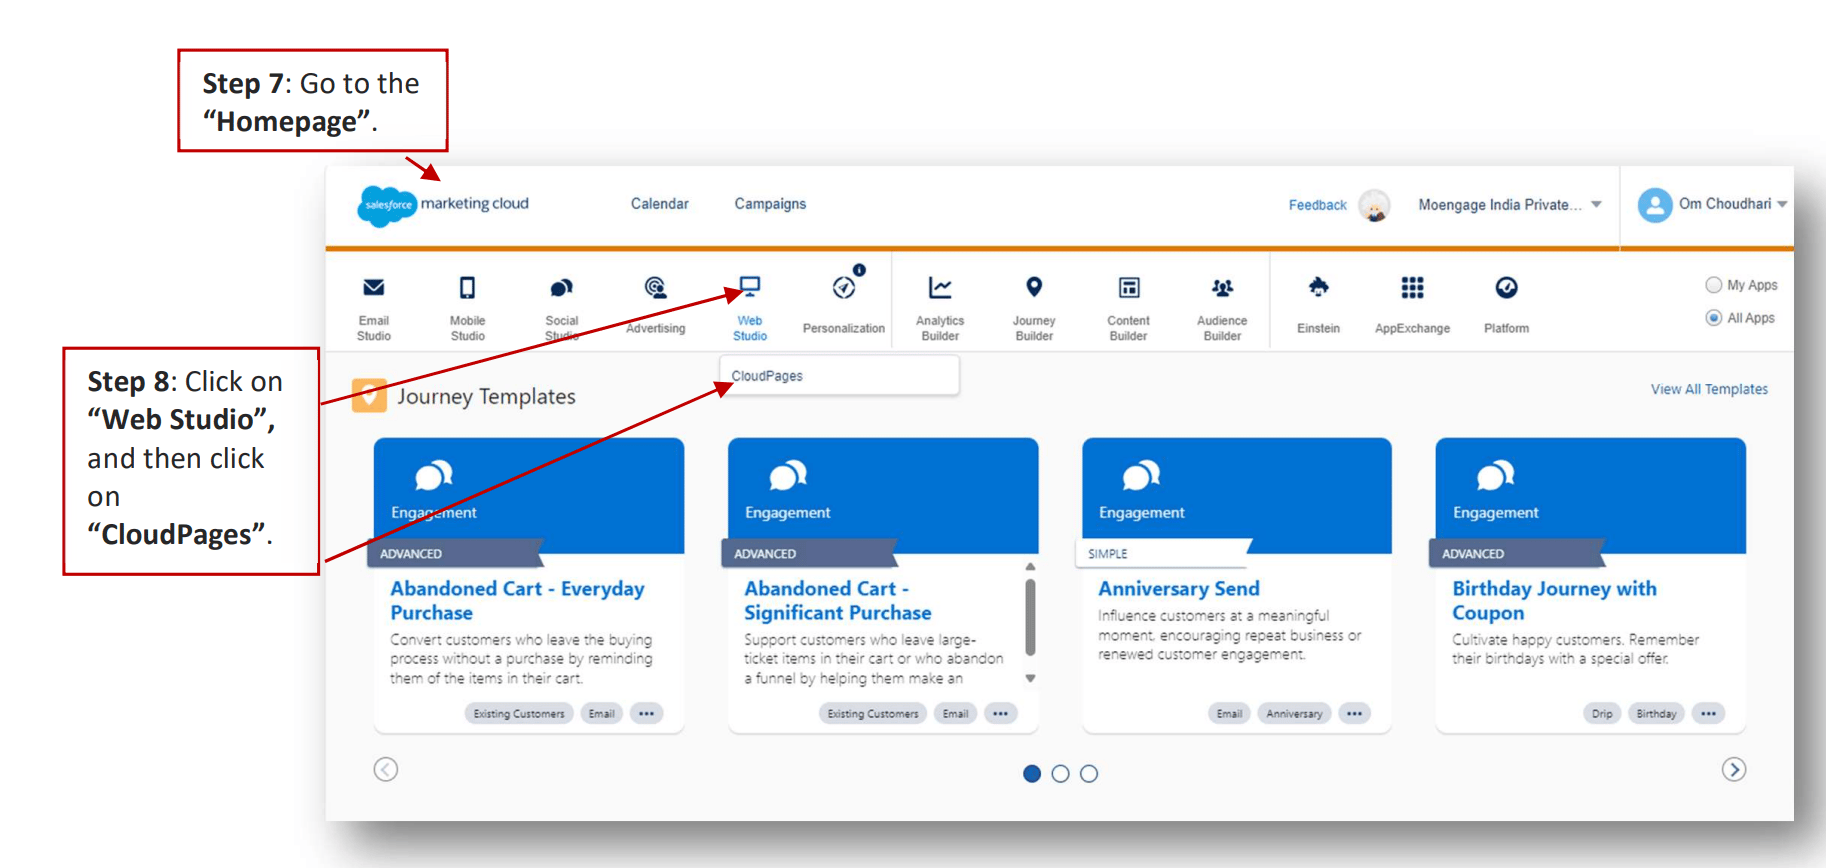
7. Go to the "Homepage".

8. Click on "Web Studio", and then click on "CloudPages".
   <img src="https://mintcdn.com/moengage-doc-2298-s2s-type-case-sensitive/TwBfsWYvIFdbxCDD/images/partner_36576006449684.png?fit=max&auto=format&n=TwBfsWYvIFdbxCDD&q=85&s=e7a65ca432d71778e6f05b688261dfb9" alt="Navigating to Web Studio > CloudPages" data-og-width="1826" width="1826" data-og-height="868" height="868" data-path="images/partner_36576006449684.png" data-optimize="true" data-opv="3" srcset="https://mintcdn.com/moengage-doc-2298-s2s-type-case-sensitive/TwBfsWYvIFdbxCDD/images/partner_36576006449684.png?w=280&fit=max&auto=format&n=TwBfsWYvIFdbxCDD&q=85&s=0e6642ae3a1f1af7fe292d5063ce6b94 280w, https://mintcdn.com/moengage-doc-2298-s2s-type-case-sensitive/TwBfsWYvIFdbxCDD/images/partner_36576006449684.png?w=560&fit=max&auto=format&n=TwBfsWYvIFdbxCDD&q=85&s=8a8dbd6538a636859bc010999b2b6797 560w, https://mintcdn.com/moengage-doc-2298-s2s-type-case-sensitive/TwBfsWYvIFdbxCDD/images/partner_36576006449684.png?w=840&fit=max&auto=format&n=TwBfsWYvIFdbxCDD&q=85&s=7e1026f060412a433ece570ee1706669 840w, https://mintcdn.com/moengage-doc-2298-s2s-type-case-sensitive/TwBfsWYvIFdbxCDD/images/partner_36576006449684.png?w=1100&fit=max&auto=format&n=TwBfsWYvIFdbxCDD&q=85&s=a6485546f77086f65d2b6d5c698de0c2 1100w, https://mintcdn.com/moengage-doc-2298-s2s-type-case-sensitive/TwBfsWYvIFdbxCDD/images/partner_36576006449684.png?w=1650&fit=max&auto=format&n=TwBfsWYvIFdbxCDD&q=85&s=ca651d8de3857dea49cdccf5b067a9e6 1650w, https://mintcdn.com/moengage-doc-2298-s2s-type-case-sensitive/TwBfsWYvIFdbxCDD/images/partner_36576006449684.png?w=2500&fit=max&auto=format&n=TwBfsWYvIFdbxCDD&q=85&s=2eb0c49607f377a73cb60b4043149531 2500w" />

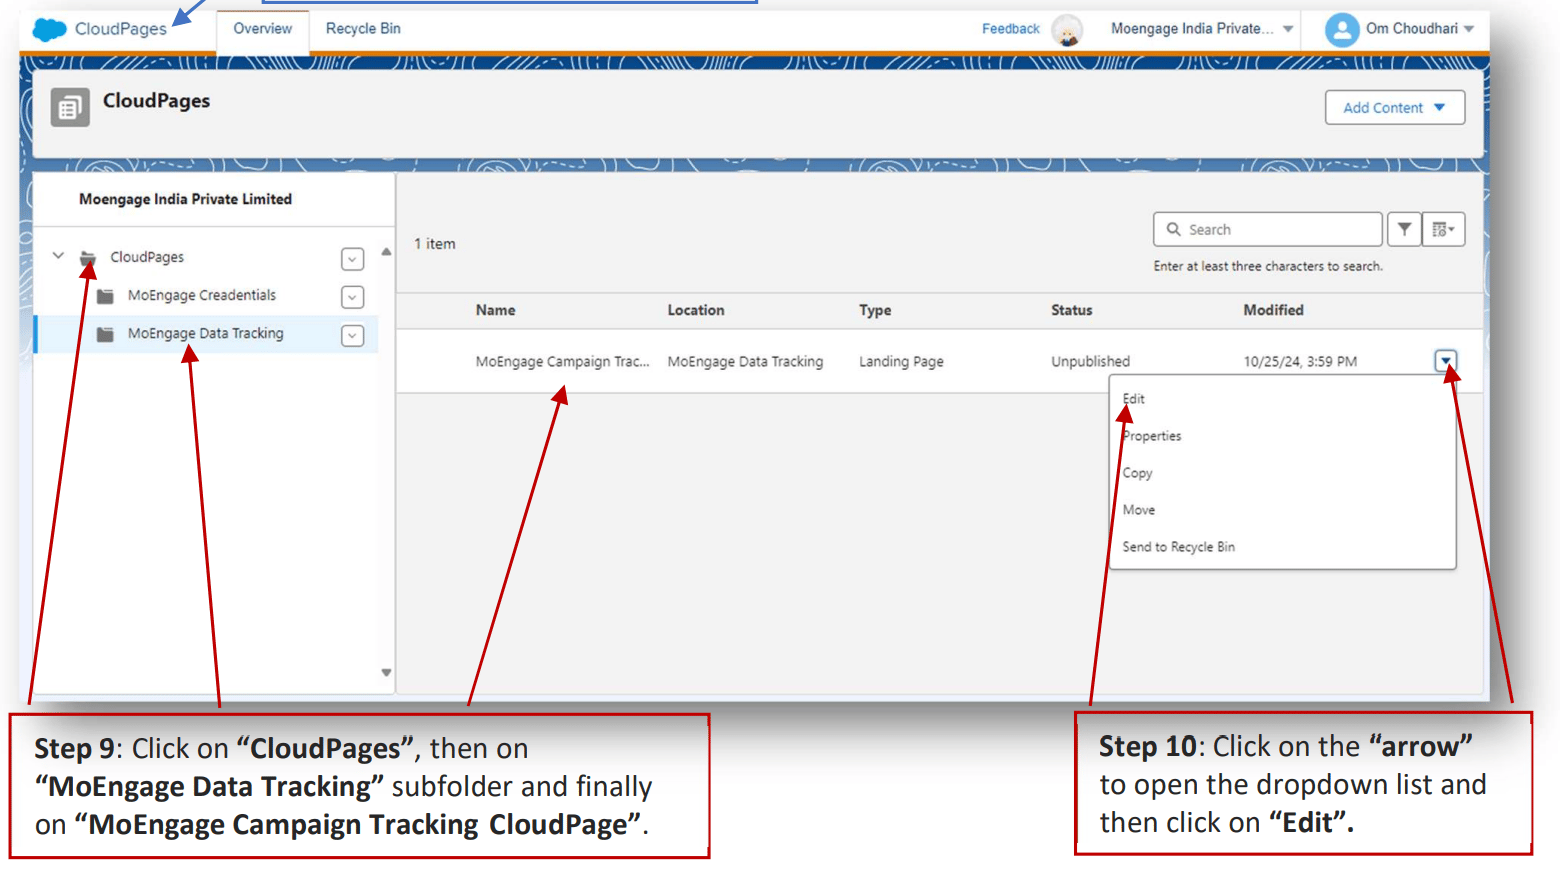
9. Once you click "CloudPages", it will be directed to this page. Click on "CloudPages", then on "MoEngage Data Tracking" subfolder, and finally on "MoEngage Campaign Tracking CloudPage".

10. Click on the "arrow" to open the dropdown list and then click on "Edit".
    <img src="https://mintcdn.com/moengage-doc-2298-s2s-type-case-sensitive/TwBfsWYvIFdbxCDD/images/partner_36576013658644.png?fit=max&auto=format&n=TwBfsWYvIFdbxCDD&q=85&s=12f2d5a26ab5356fb19025f12bd95703" alt="Editing the MoEngage Campaign Tracking CloudPage" width="1560" height="890" data-path="images/partner_36576013658644.png" />

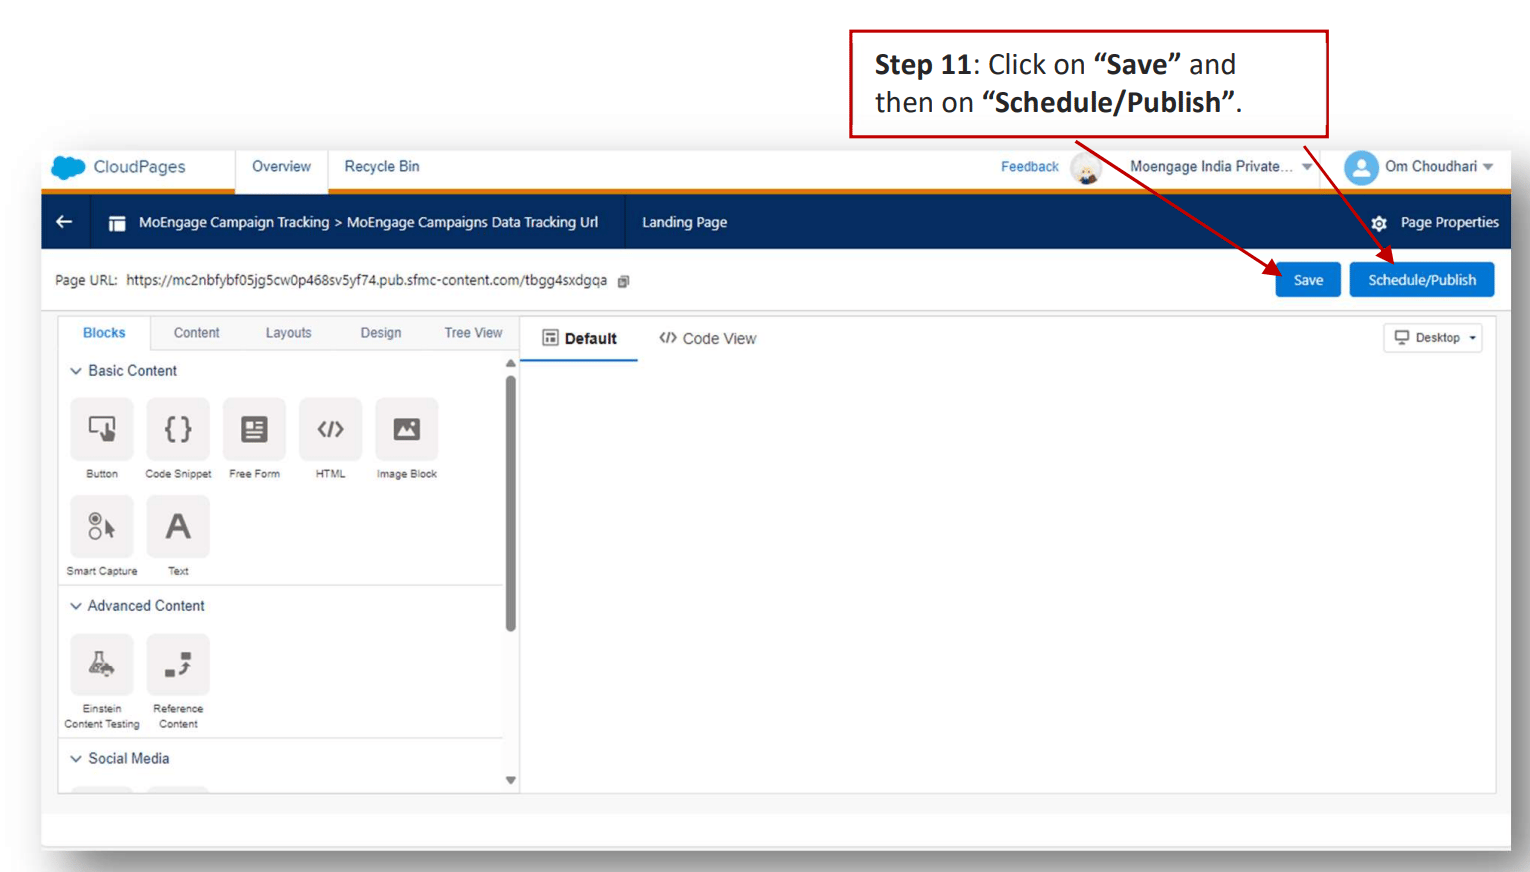
11. Click on "Save" and then on "Schedule/Publish".
    <img src="https://mintcdn.com/moengage-doc-2298-s2s-type-case-sensitive/TwBfsWYvIFdbxCDD/images/partner_36576013658900.png?fit=max&auto=format&n=TwBfsWYvIFdbxCDD&q=85&s=6c30950ae6fe153d9db651689188ecf5" alt="Saving and publishing the MoEngage Campaign Tracking CloudPage" width="1530" height="872" data-path="images/partner_36576013658900.png" />

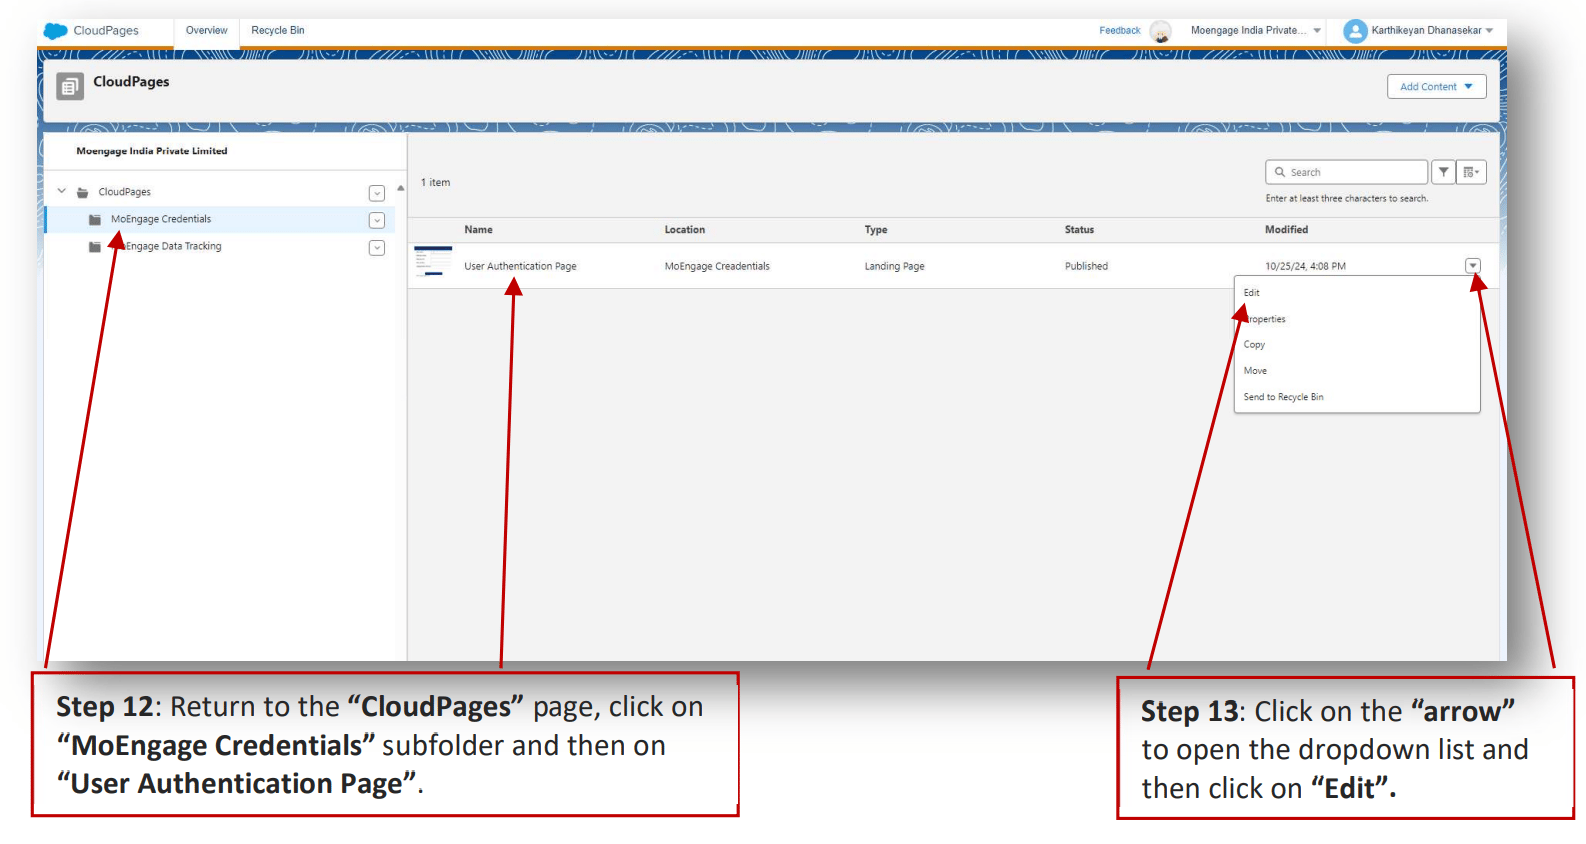
12. Return to the "CloudPages" page, click on "MoEngage Credentials" subfolder and then on "User Authentication Page".

13. Click on the "arrow" to open the dropdown list and then click on "Edit".
    <img src="https://mintcdn.com/moengage-doc-2298-s2s-type-case-sensitive/TwBfsWYvIFdbxCDD/images/partner_36576006451220.png?fit=max&auto=format&n=TwBfsWYvIFdbxCDD&q=85&s=0ffde3fe03af09c69bb75ebaf0084044" alt="Editing the User Authentication Page CloudPage" width="1586" height="844" data-path="images/partner_36576006451220.png" />

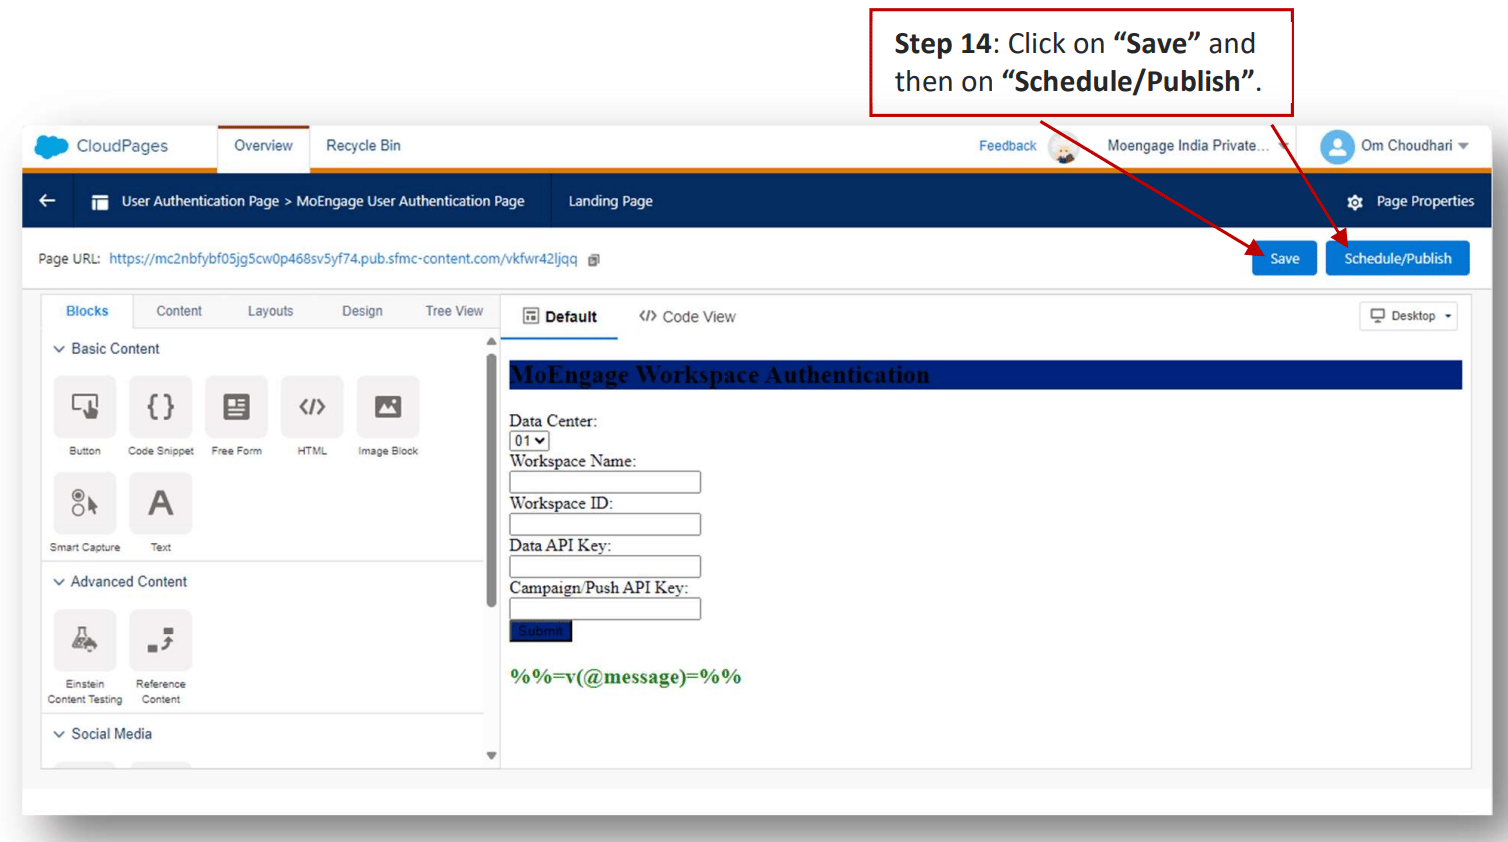
14. Click on "Save" and then on "Schedule/Publish".
    <img src="https://mintcdn.com/moengage-doc-2298-s2s-type-case-sensitive/TwBfsWYvIFdbxCDD/images/partner_36576013659540.png?fit=max&auto=format&n=TwBfsWYvIFdbxCDD&q=85&s=202d920872809913e589ce456efb9b3f" alt="Saving and publishing the User Authentication Page" width="1508" height="842" data-path="images/partner_36576013659540.png" />

## Verify Data Extension and external keys

Ensure the following Data Extensions (DEs) are properly named and configured:

### A. MoEngage Tracking Data

It stores campaign tracking information.

1. Go to the "Homepage".

2. Click on "Audience Builder", and then click on "Contact Builder".
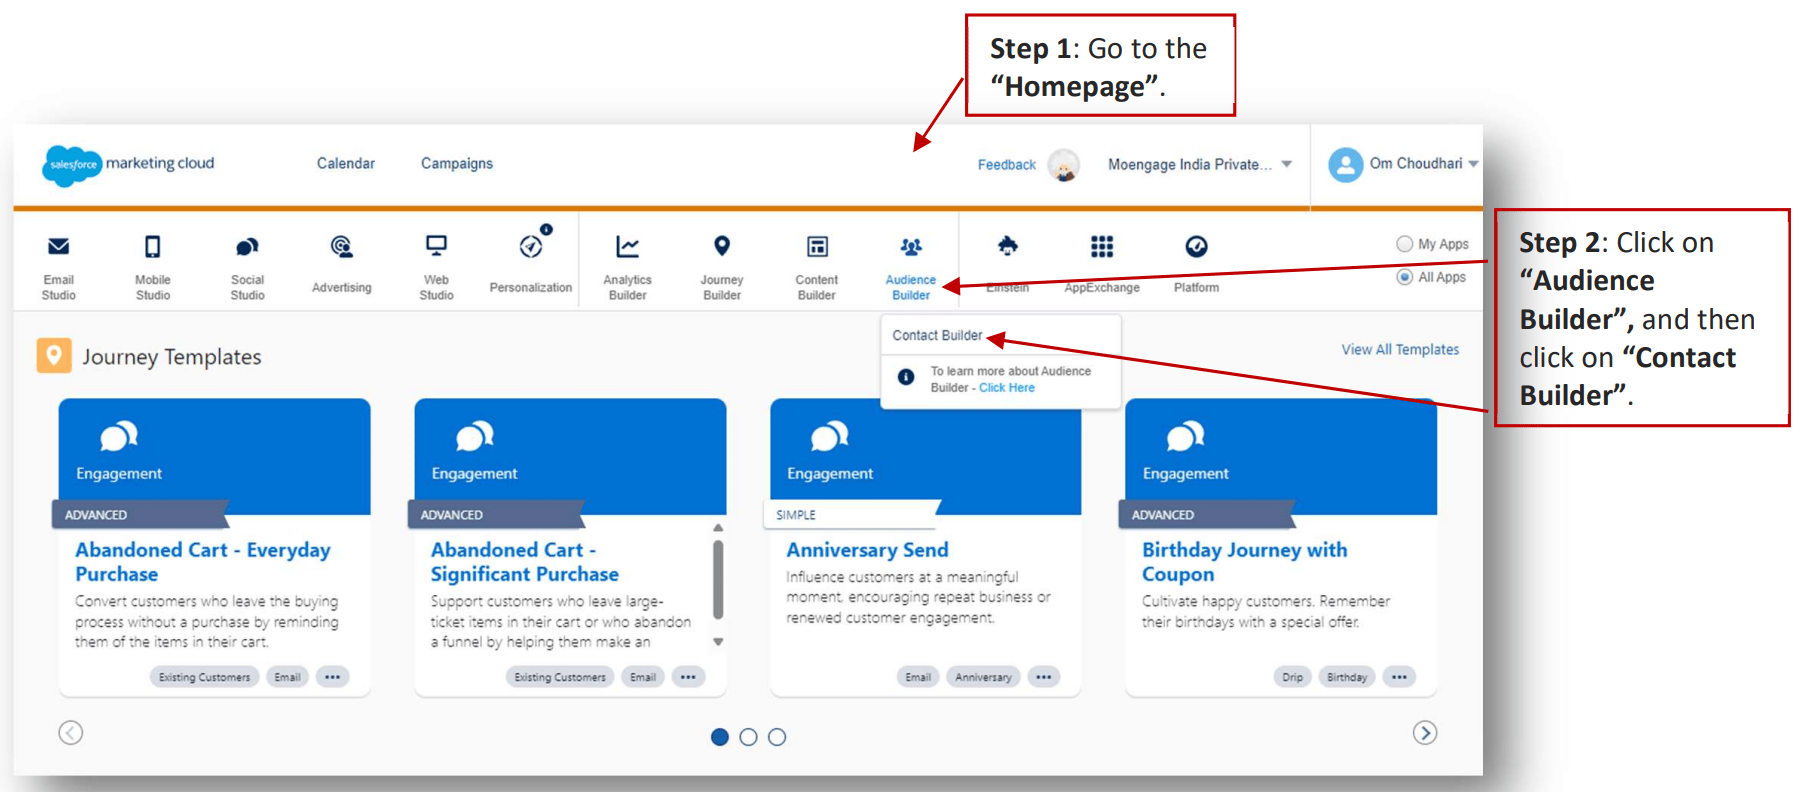
   <img src="https://mintcdn.com/moengage-doc-2298-s2s-type-case-sensitive/TwBfsWYvIFdbxCDD/images/partner_36576006452372.png?fit=max&auto=format&n=TwBfsWYvIFdbxCDD&q=85&s=07c72273abb6a37259aeb6ed1118a2d2" alt="Navigating to Audience Builder > Contact Builder" data-og-width="1812" width="1812" data-og-height="792" height="792" data-path="images/partner_36576006452372.png" data-optimize="true" data-opv="3" srcset="https://mintcdn.com/moengage-doc-2298-s2s-type-case-sensitive/TwBfsWYvIFdbxCDD/images/partner_36576006452372.png?w=280&fit=max&auto=format&n=TwBfsWYvIFdbxCDD&q=85&s=4e3cf9db16a8bfac44c2b9de457ec1e5 280w, https://mintcdn.com/moengage-doc-2298-s2s-type-case-sensitive/TwBfsWYvIFdbxCDD/images/partner_36576006452372.png?w=560&fit=max&auto=format&n=TwBfsWYvIFdbxCDD&q=85&s=7cf88c80714df6c19aa6e9715cd2bc71 560w, https://mintcdn.com/moengage-doc-2298-s2s-type-case-sensitive/TwBfsWYvIFdbxCDD/images/partner_36576006452372.png?w=840&fit=max&auto=format&n=TwBfsWYvIFdbxCDD&q=85&s=aacff203fb706f257c537c429d6286ee 840w, https://mintcdn.com/moengage-doc-2298-s2s-type-case-sensitive/TwBfsWYvIFdbxCDD/images/partner_36576006452372.png?w=1100&fit=max&auto=format&n=TwBfsWYvIFdbxCDD&q=85&s=422dc5ada54bf39b491474ba9394578d 1100w, https://mintcdn.com/moengage-doc-2298-s2s-type-case-sensitive/TwBfsWYvIFdbxCDD/images/partner_36576006452372.png?w=1650&fit=max&auto=format&n=TwBfsWYvIFdbxCDD&q=85&s=48bebab931756360f5120b89e89f4de1 1650w, https://mintcdn.com/moengage-doc-2298-s2s-type-case-sensitive/TwBfsWYvIFdbxCDD/images/partner_36576006452372.png?w=2500&fit=max&auto=format&n=TwBfsWYvIFdbxCDD&q=85&s=c200f40fd3b09428ac178d382618e1b8 2500w" />

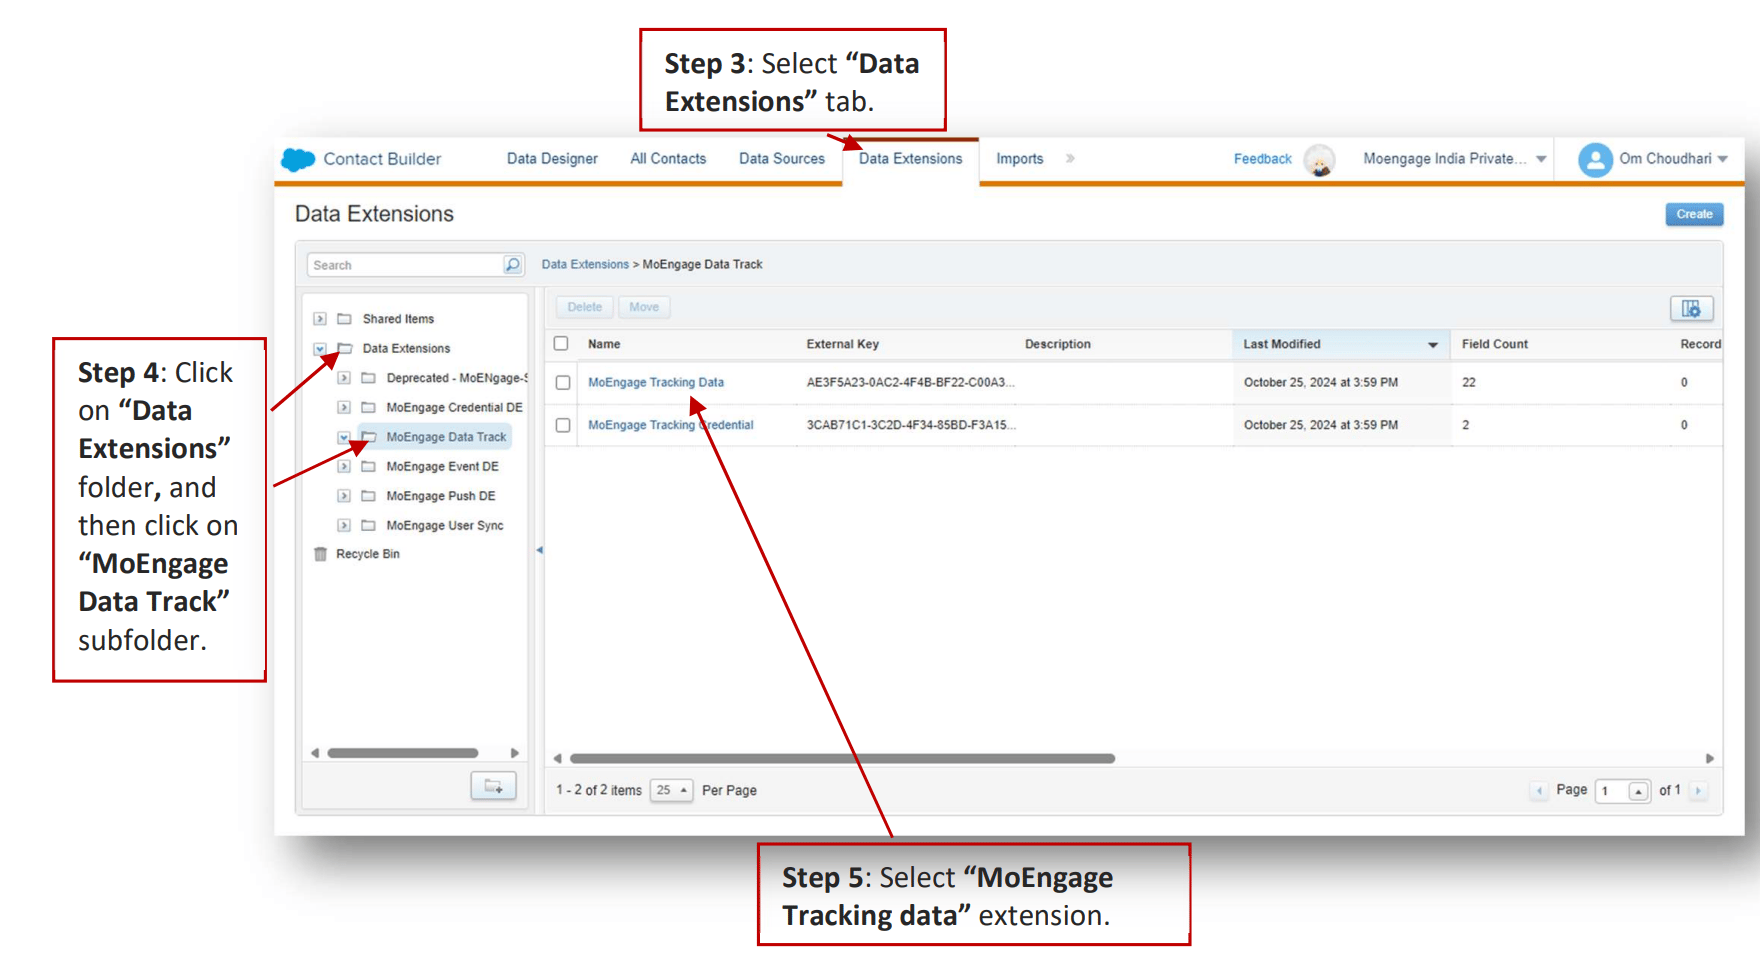
3. Select "Data Extensions" tab.

4. Click on "Data Extensions" folder, and then click on "MoEngage Data Track" subfolder.

5. Select "MoEngage Tracking data" extension.
   <img src="https://mintcdn.com/moengage-doc-2298-s2s-type-case-sensitive/TwBfsWYvIFdbxCDD/images/partner_36576013660052.png?fit=max&auto=format&n=TwBfsWYvIFdbxCDD&q=85&s=4d78bc303b15fc814a93afdc85fc1ba5" alt="MoEngage Tracking data Data Extension details" width="1760" height="968" data-path="images/partner_36576013660052.png" />

   Here you can find the "External Key". Please ensure it is accurate. \[Optional] If external key needs to be entered or changed, click on "External Key" input field, paste or enter the external key and click on "Done".

### B. MoEngage Credentials

It stores the credentials for the Data Tracking CloudPage:

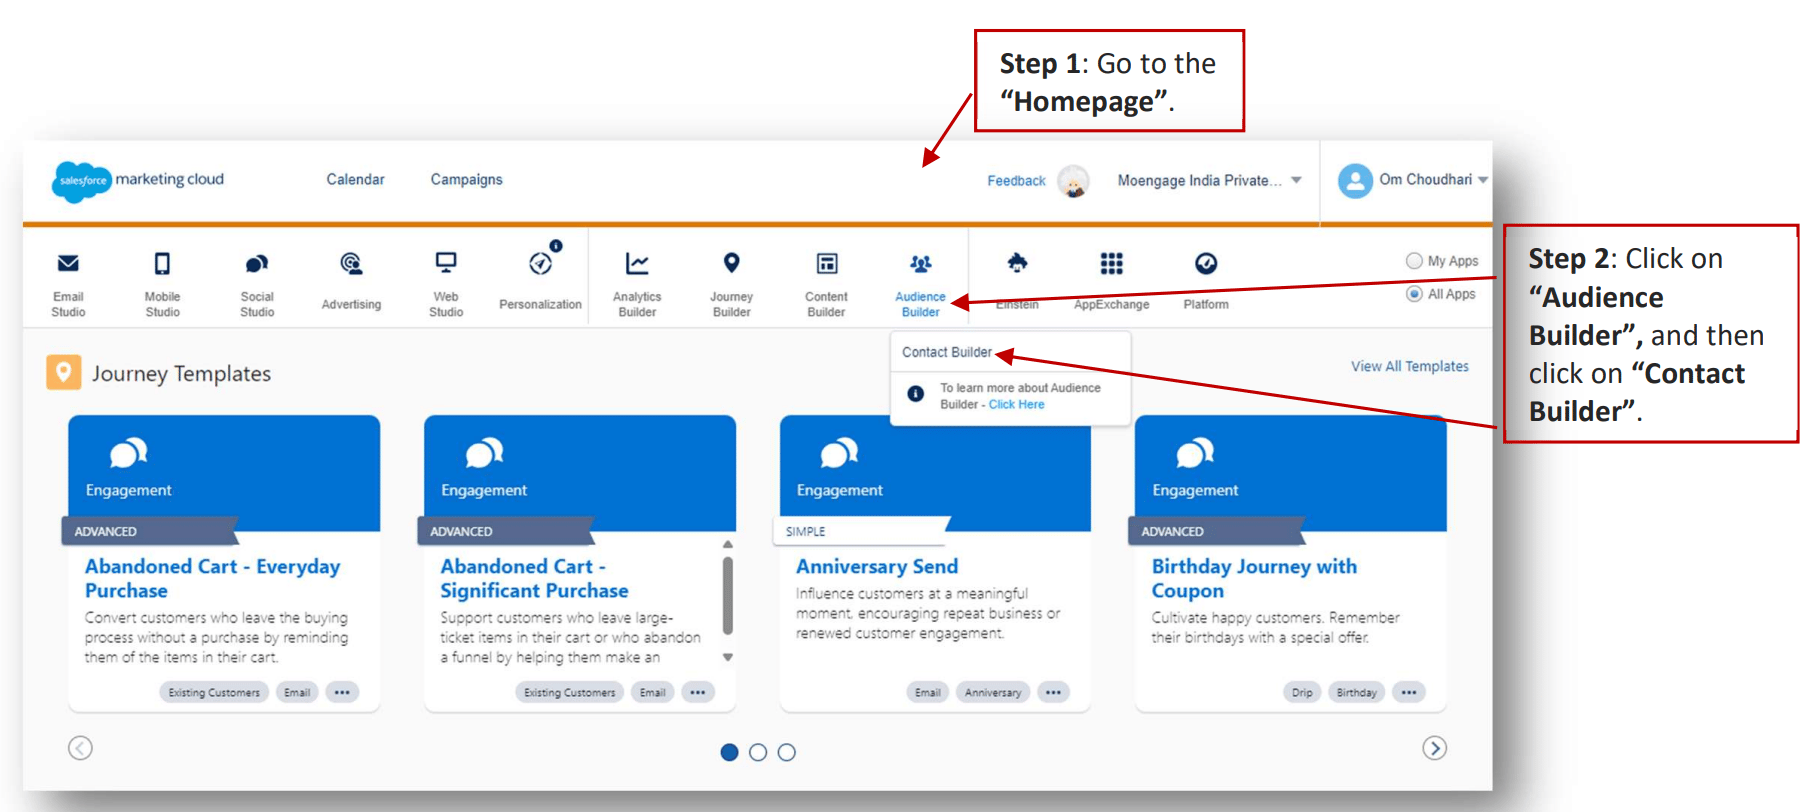
1. Go to the "Homepage".

2. Click on "Audience Builder", and then click on "Contact Builder".
   <img src="https://mintcdn.com/moengage-doc-2298-s2s-type-case-sensitive/TwBfsWYvIFdbxCDD/images/partner_36576013660564.png?fit=max&auto=format&n=TwBfsWYvIFdbxCDD&q=85&s=42237779108cbf85a9140161d26858f6" alt="Navigating to Audience Builder > Contact Builder" data-og-width="1812" width="1812" data-og-height="812" height="812" data-path="images/partner_36576013660564.png" data-optimize="true" data-opv="3" srcset="https://mintcdn.com/moengage-doc-2298-s2s-type-case-sensitive/TwBfsWYvIFdbxCDD/images/partner_36576013660564.png?w=280&fit=max&auto=format&n=TwBfsWYvIFdbxCDD&q=85&s=45407bede56695f9d3cf6974f7426008 280w, https://mintcdn.com/moengage-doc-2298-s2s-type-case-sensitive/TwBfsWYvIFdbxCDD/images/partner_36576013660564.png?w=560&fit=max&auto=format&n=TwBfsWYvIFdbxCDD&q=85&s=8d9542b489fc473bafa5015a77ec305b 560w, https://mintcdn.com/moengage-doc-2298-s2s-type-case-sensitive/TwBfsWYvIFdbxCDD/images/partner_36576013660564.png?w=840&fit=max&auto=format&n=TwBfsWYvIFdbxCDD&q=85&s=580b9b554b28a701c69dfe8a9d4110e2 840w, https://mintcdn.com/moengage-doc-2298-s2s-type-case-sensitive/TwBfsWYvIFdbxCDD/images/partner_36576013660564.png?w=1100&fit=max&auto=format&n=TwBfsWYvIFdbxCDD&q=85&s=13a5e34262cc3d1b7609644e490d2c15 1100w, https://mintcdn.com/moengage-doc-2298-s2s-type-case-sensitive/TwBfsWYvIFdbxCDD/images/partner_36576013660564.png?w=1650&fit=max&auto=format&n=TwBfsWYvIFdbxCDD&q=85&s=dce736e071b11dc40893fab122d61501 1650w, https://mintcdn.com/moengage-doc-2298-s2s-type-case-sensitive/TwBfsWYvIFdbxCDD/images/partner_36576013660564.png?w=2500&fit=max&auto=format&n=TwBfsWYvIFdbxCDD&q=85&s=42cecf88140bb41c10630300ba605f91 2500w" />

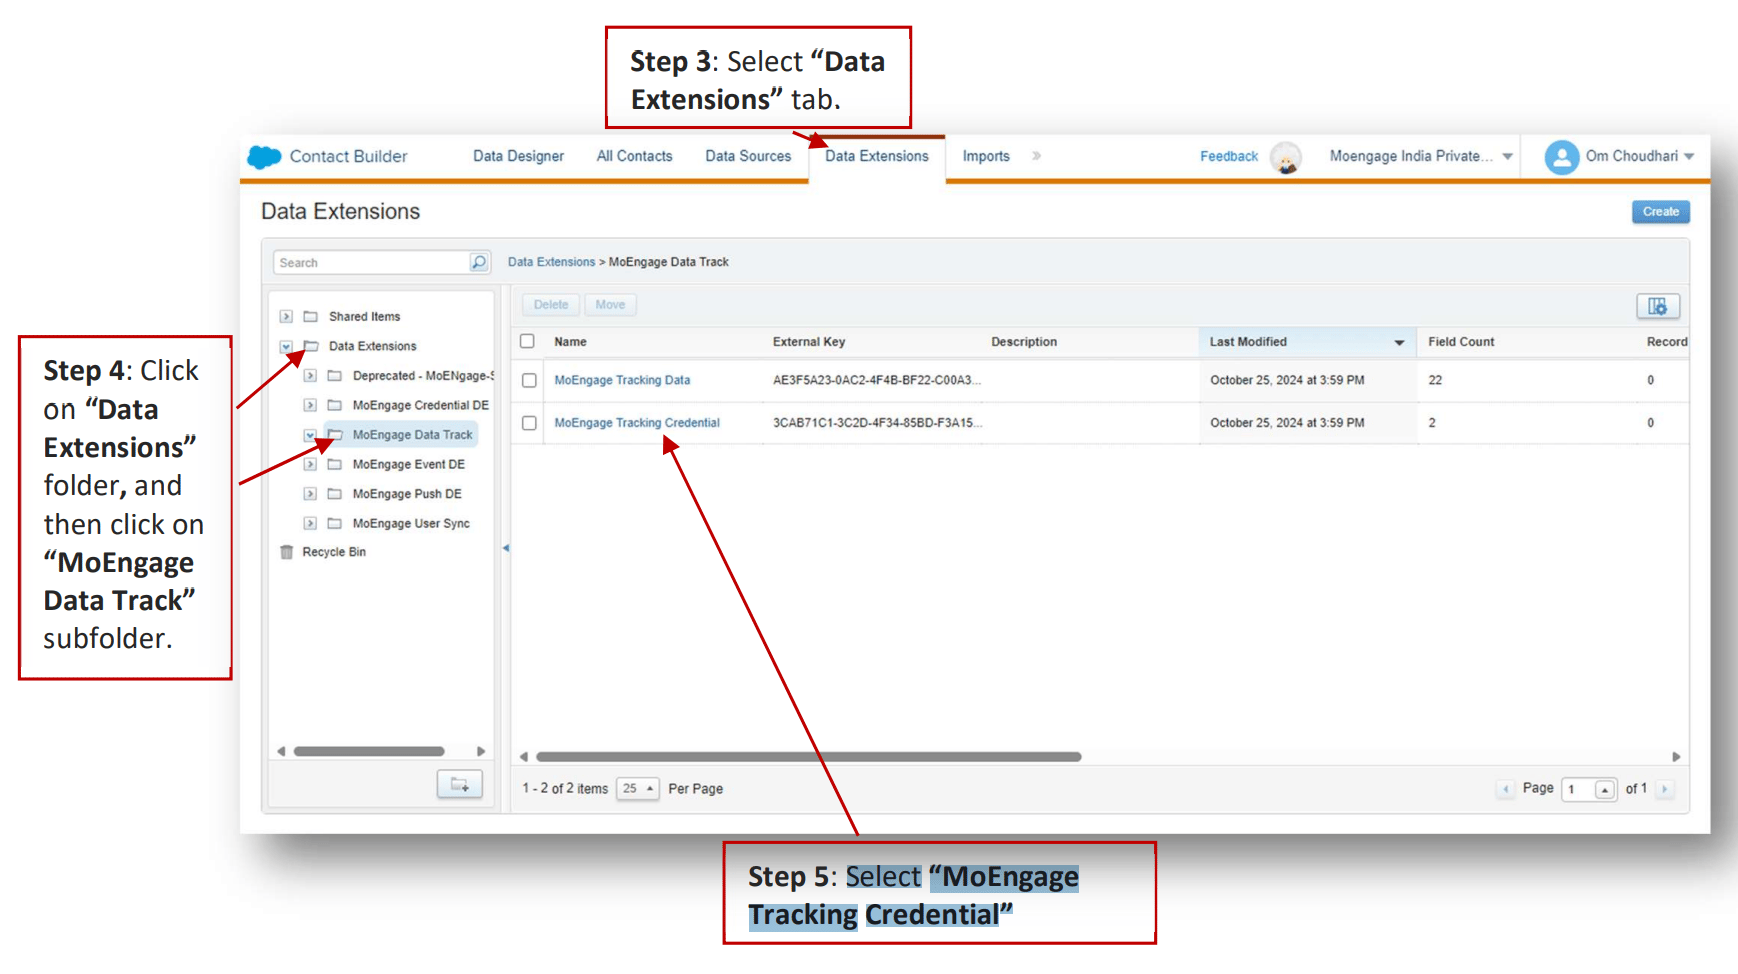
3. Select "Data Extensions" tab.

4. Click on "Data Extensions" folder, and then click on "MoEngage Data Track" subfolder.

5. Select "MoEngage Tracking Credential".
   <img src="https://mintcdn.com/moengage-doc-2298-s2s-type-case-sensitive/TwBfsWYvIFdbxCDD/images/partner_36576013660820.png?fit=max&auto=format&n=TwBfsWYvIFdbxCDD&q=85&s=6d9e40143421b4f8bfddf380f1fe0d32" alt="MoEngage Tracking Credential Data Extension details" width="1738" height="974" data-path="images/partner_36576013660820.png" />

   Here you can find the "External Key". Please ensure it is accurate. \[Optional] If external key needs to be entered or changed, click on "External Key" input field, paste or enter the external key and click on "Done".

### C. MoEngage Event Activity Log

It logs Event Custom Activity information.

1. Go to the "Homepage".

2. Click on "Audience Builder", and then click on "Contact Builder".
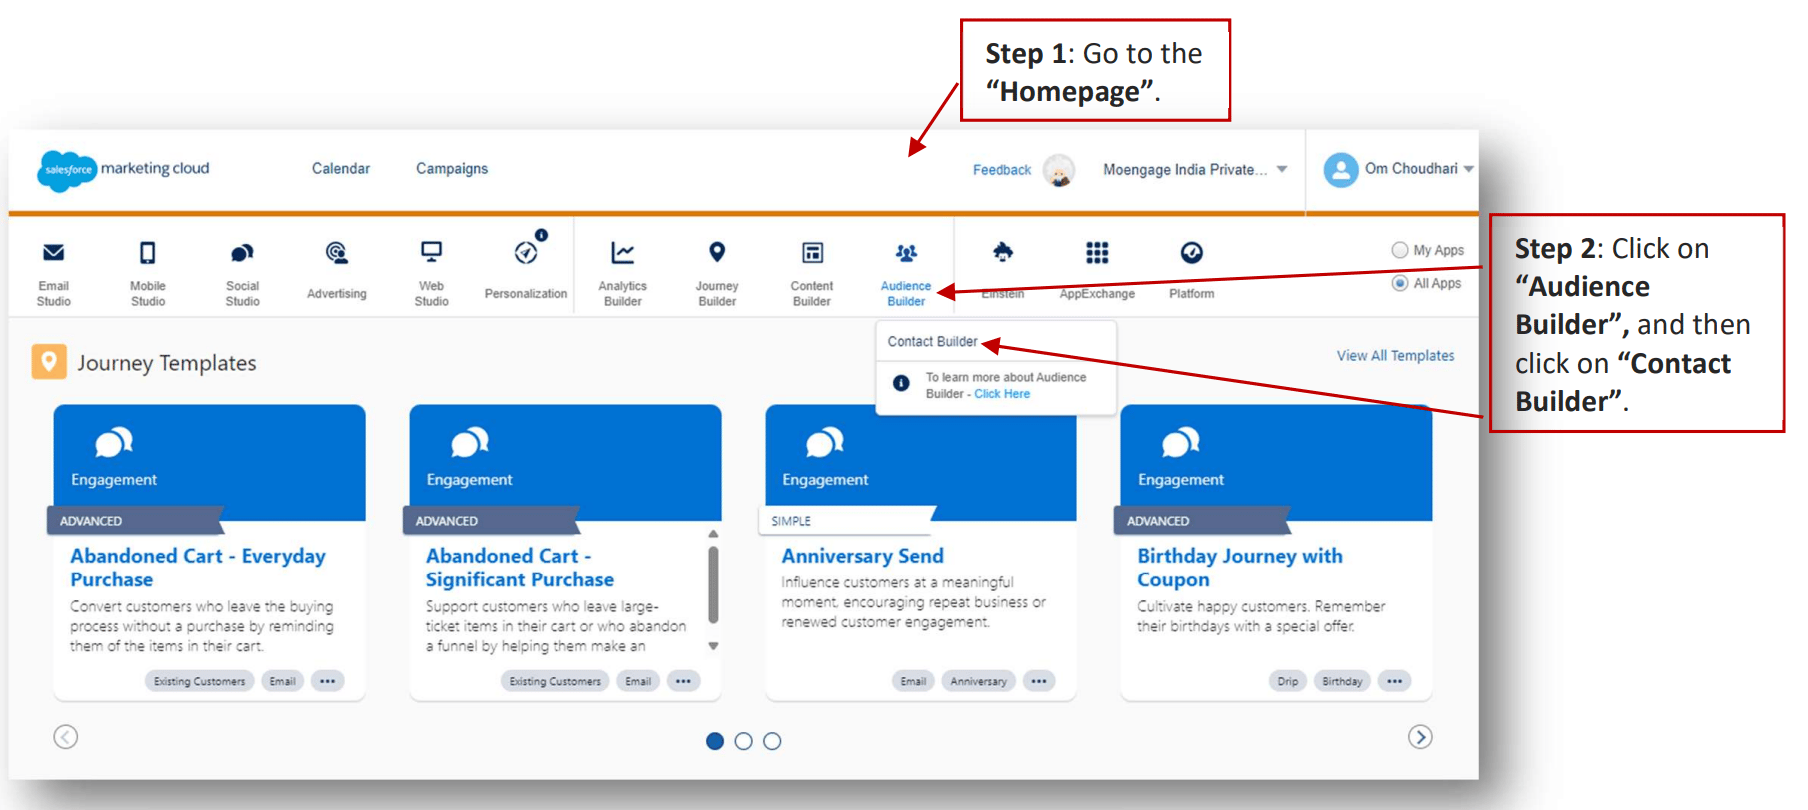
   <img src="https://mintcdn.com/moengage-doc-2298-s2s-type-case-sensitive/TwBfsWYvIFdbxCDD/images/partner_36576006453524.png?fit=max&auto=format&n=TwBfsWYvIFdbxCDD&q=85&s=53b02d35321ac5fe0e7bf895fe3bb97b" alt="Navigating to Audience Builder > Contact Builder" data-og-width="1808" width="1808" data-og-height="810" height="810" data-path="images/partner_36576006453524.png" data-optimize="true" data-opv="3" srcset="https://mintcdn.com/moengage-doc-2298-s2s-type-case-sensitive/TwBfsWYvIFdbxCDD/images/partner_36576006453524.png?w=280&fit=max&auto=format&n=TwBfsWYvIFdbxCDD&q=85&s=fca774cf2b161c34cba987dd2dcbdff1 280w, https://mintcdn.com/moengage-doc-2298-s2s-type-case-sensitive/TwBfsWYvIFdbxCDD/images/partner_36576006453524.png?w=560&fit=max&auto=format&n=TwBfsWYvIFdbxCDD&q=85&s=48b6f5bde6245070a85c3c70c004bfaf 560w, https://mintcdn.com/moengage-doc-2298-s2s-type-case-sensitive/TwBfsWYvIFdbxCDD/images/partner_36576006453524.png?w=840&fit=max&auto=format&n=TwBfsWYvIFdbxCDD&q=85&s=822ef203e92da27f05edb666374df322 840w, https://mintcdn.com/moengage-doc-2298-s2s-type-case-sensitive/TwBfsWYvIFdbxCDD/images/partner_36576006453524.png?w=1100&fit=max&auto=format&n=TwBfsWYvIFdbxCDD&q=85&s=22f9bb7bccb6f9aa1ee51105f27ab5b7 1100w, https://mintcdn.com/moengage-doc-2298-s2s-type-case-sensitive/TwBfsWYvIFdbxCDD/images/partner_36576006453524.png?w=1650&fit=max&auto=format&n=TwBfsWYvIFdbxCDD&q=85&s=9718d0d1b5dc25dda2baa9add53d459b 1650w, https://mintcdn.com/moengage-doc-2298-s2s-type-case-sensitive/TwBfsWYvIFdbxCDD/images/partner_36576006453524.png?w=2500&fit=max&auto=format&n=TwBfsWYvIFdbxCDD&q=85&s=7d9e970de082cd1cf79cbe5f05d2a10c 2500w" />

3. Select "Data Extensions" tab.

4. Click on "Data Extensions" folder, and then click on "MoEngage Event DE" subfolder.

5. Select "MoEngage Tracking Credential".
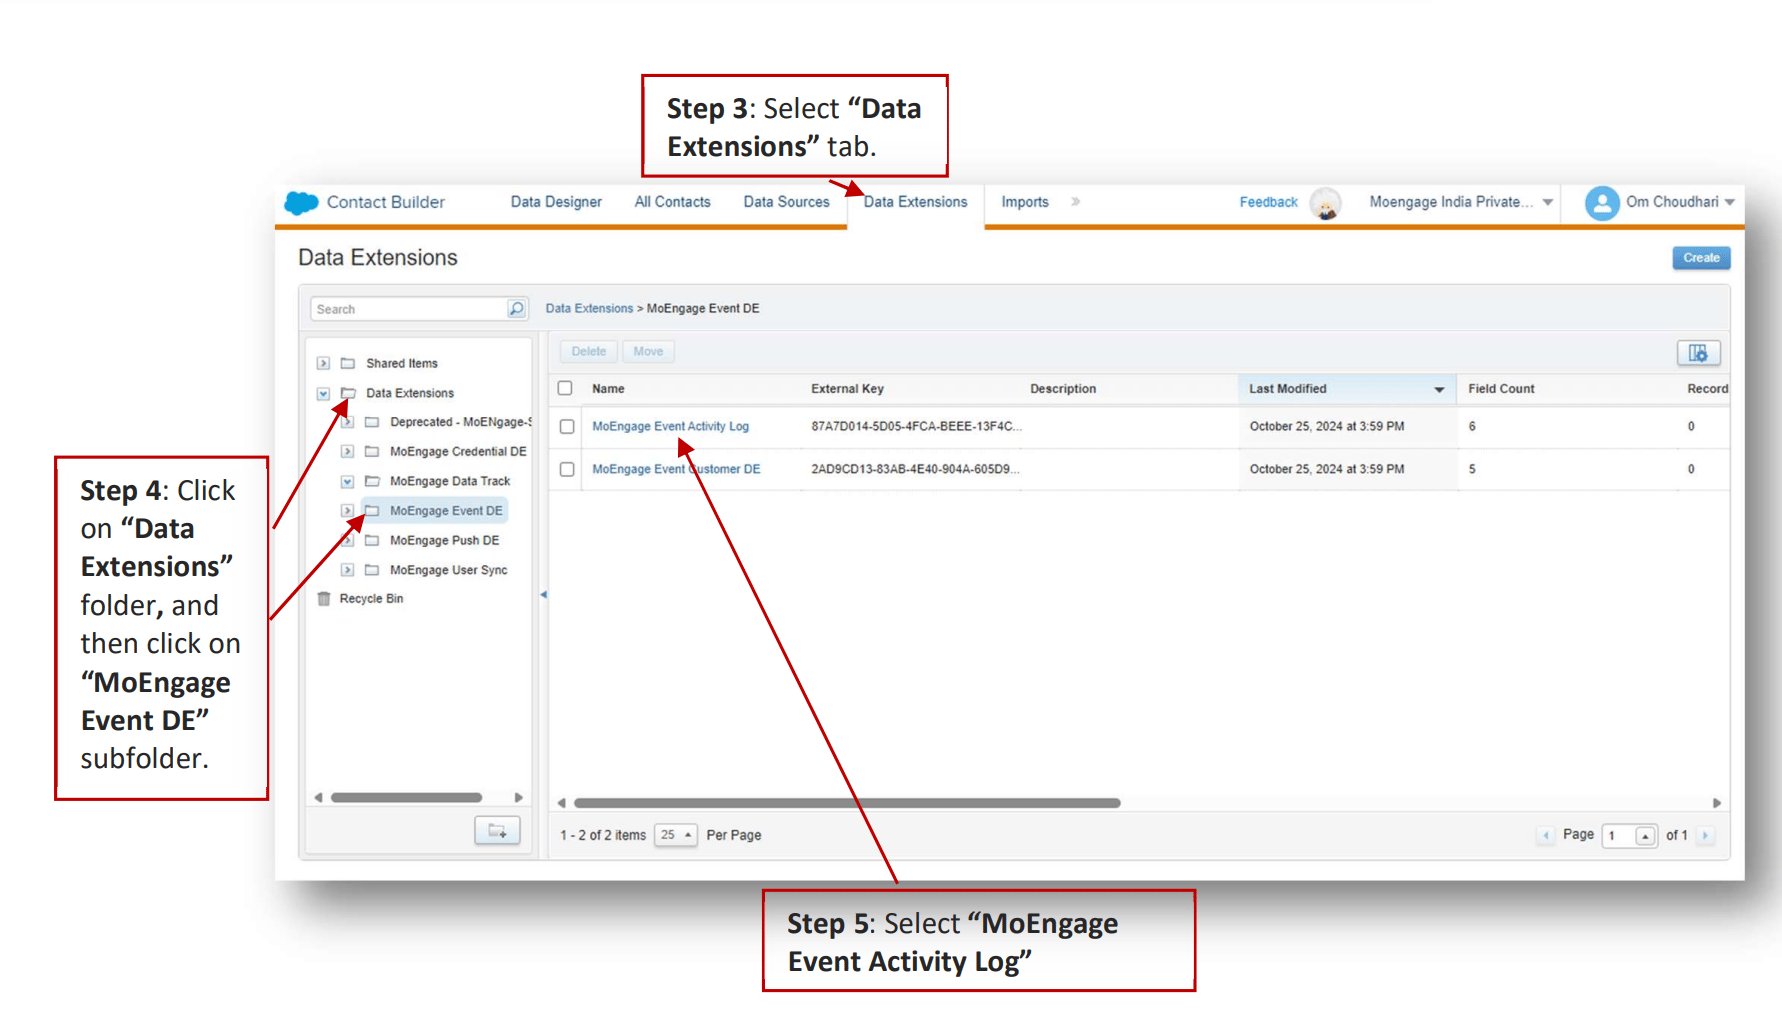
   <img src="https://mintcdn.com/moengage-doc-2298-s2s-type-case-sensitive/TwBfsWYvIFdbxCDD/images/partner_36576006453908.png?fit=max&auto=format&n=TwBfsWYvIFdbxCDD&q=85&s=b8a5be0800d822f8dcc5bec6b898e2f3" alt="MoEngage Event DE folder with Data Extensions" width="1782" height="1030" data-path="images/partner_36576006453908.png" />

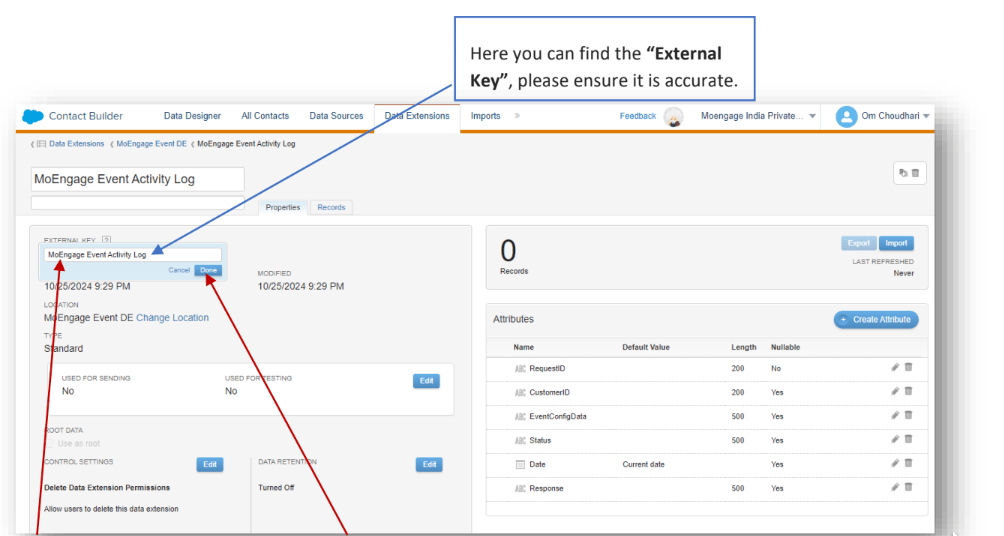
6. Select "MoEngage Event Activity Log".

   Here you can find the "External Key". Please ensure it is accurate. \[Optional] If external key needs to be entered or changed, click on "External Key" input field, paste or enter the external key and click on "Done".
   <img src="https://mintcdn.com/moengage-doc-2298-s2s-type-case-sensitive/G4CXjRSenid0QKfm/images/partner_43091841847828.png?fit=max&auto=format&n=G4CXjRSenid0QKfm&q=85&s=74c51fc33bcbd80e0510071bf972b0b6" alt="MoEngage Event Activity Log External Key field" width="1004" height="536" data-path="images/partner_43091841847828.png" />

### D. MoEngage Push Activity Log

It logs Push Custom Activity information.

1. Go to the "Homepage".

2. Click on "Audience Builder", and then click on "Contact Builder".

   <img src="https://mintcdn.com/moengage-doc-2298-s2s-type-case-sensitive/TwBfsWYvIFdbxCDD/images/partner_36576006453524.png?fit=max&auto=format&n=TwBfsWYvIFdbxCDD&q=85&s=53b02d35321ac5fe0e7bf895fe3bb97b" alt="Navigating to Audience Builder > Contact Builder" data-og-width="1808" width="1808" data-og-height="810" height="810" data-path="images/partner_36576006453524.png" data-optimize="true" data-opv="3" srcset="https://mintcdn.com/moengage-doc-2298-s2s-type-case-sensitive/TwBfsWYvIFdbxCDD/images/partner_36576006453524.png?w=280&fit=max&auto=format&n=TwBfsWYvIFdbxCDD&q=85&s=fca774cf2b161c34cba987dd2dcbdff1 280w, https://mintcdn.com/moengage-doc-2298-s2s-type-case-sensitive/TwBfsWYvIFdbxCDD/images/partner_36576006453524.png?w=560&fit=max&auto=format&n=TwBfsWYvIFdbxCDD&q=85&s=48b6f5bde6245070a85c3c70c004bfaf 560w, https://mintcdn.com/moengage-doc-2298-s2s-type-case-sensitive/TwBfsWYvIFdbxCDD/images/partner_36576006453524.png?w=840&fit=max&auto=format&n=TwBfsWYvIFdbxCDD&q=85&s=822ef203e92da27f05edb666374df322 840w, https://mintcdn.com/moengage-doc-2298-s2s-type-case-sensitive/TwBfsWYvIFdbxCDD/images/partner_36576006453524.png?w=1100&fit=max&auto=format&n=TwBfsWYvIFdbxCDD&q=85&s=22f9bb7bccb6f9aa1ee51105f27ab5b7 1100w, https://mintcdn.com/moengage-doc-2298-s2s-type-case-sensitive/TwBfsWYvIFdbxCDD/images/partner_36576006453524.png?w=1650&fit=max&auto=format&n=TwBfsWYvIFdbxCDD&q=85&s=9718d0d1b5dc25dda2baa9add53d459b 1650w, https://mintcdn.com/moengage-doc-2298-s2s-type-case-sensitive/TwBfsWYvIFdbxCDD/images/partner_36576006453524.png?w=2500&fit=max&auto=format&n=TwBfsWYvIFdbxCDD&q=85&s=7d9e970de082cd1cf79cbe5f05d2a10c 2500w" />

3. Select "Data Extensions" tab.

4. Click on "Data Extensions" folder, and then click on "MoEngage Push DE" subfolder.

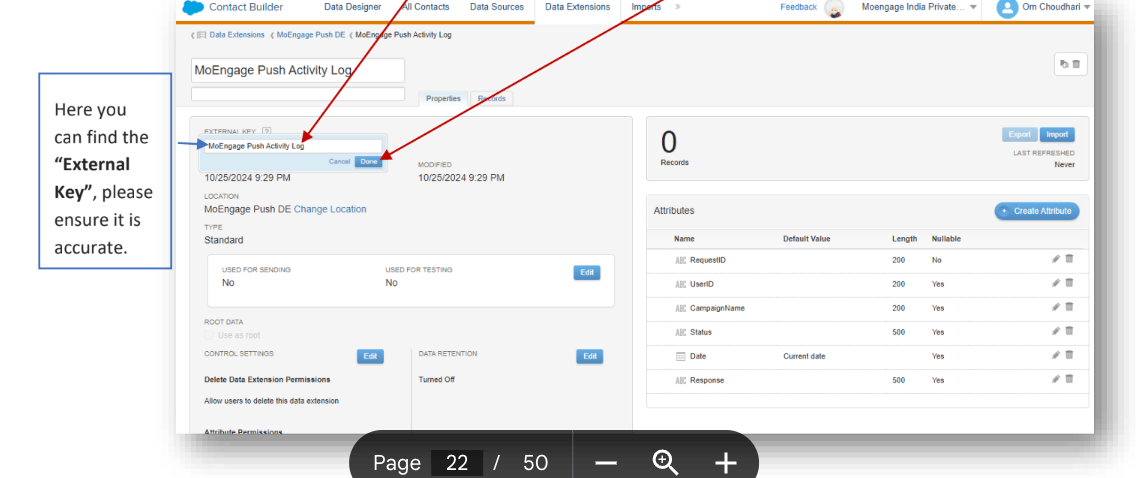
5. Select "MoEngage Push Activity Log".

   <img src="https://mintcdn.com/moengage-doc-2298-s2s-type-case-sensitive/TwBfsWYvIFdbxCDD/images/partner_36576006453908.png?fit=max&auto=format&n=TwBfsWYvIFdbxCDD&q=85&s=b8a5be0800d822f8dcc5bec6b898e2f3" alt="MoEngage Push DE folder with Data Extensions" width="1782" height="1030" data-path="images/partner_36576006453908.png" />

   Here you can find the "External Key". Please ensure it is accurate. \[Optional] If external key needs to be entered or changed, click on "External Key" input field, paste or enter the external key and click on "Done".
   <img src="https://mintcdn.com/moengage-doc-2298-s2s-type-case-sensitive/G4CXjRSenid0QKfm/images/partner_43091889316756.png?fit=max&auto=format&n=G4CXjRSenid0QKfm&q=85&s=bf20e8da88369069e790bdb059ee0179" alt="MoEngage Push Activity Log External Key field" width="1136" height="478" data-path="images/partner_43091889316756.png" />

## Configure Data Extension

### A. Configure Data Extensions

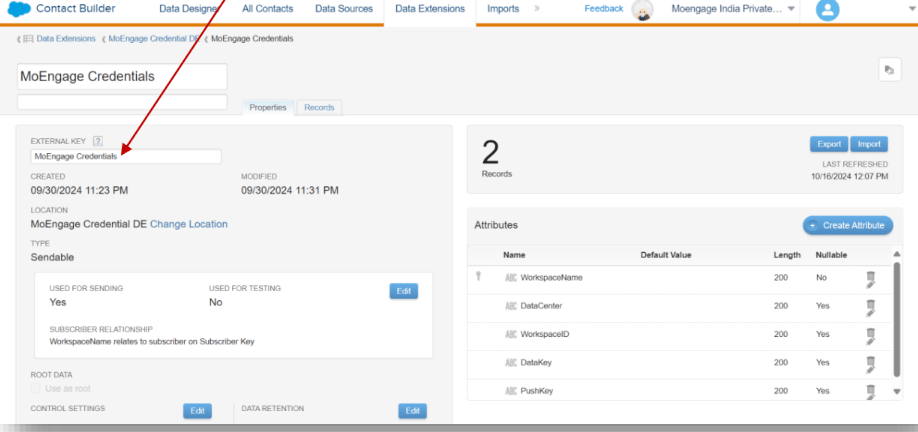
1. Change the external key of the credentials data extension from the solution package to "MoEngage Credentials".
   <img src="https://mintcdn.com/moengage-doc-2298-s2s-type-case-sensitive/G4CXjRSenid0QKfm/images/partner_43091841852564.png?fit=max&auto=format&n=G4CXjRSenid0QKfm&q=85&s=b0cc82be045efdb6fe7536de33f55221" alt="Changing external key of the Credentials Data Extension" width="918" height="432" data-path="images/partner_43091841852564.png" />

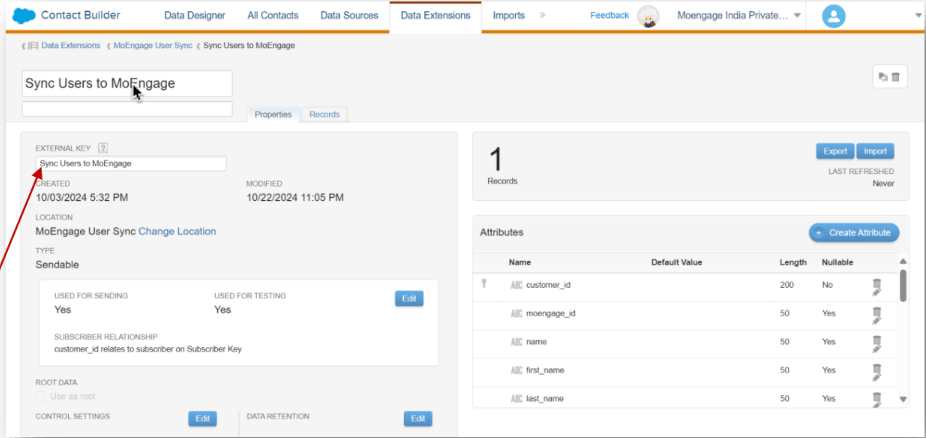
2. Change the external key of the "Sync Users to MoEngage" data extension from the solution package to "Sync Users to MoEngage".
   <img src="https://mintcdn.com/moengage-doc-2298-s2s-type-case-sensitive/G4CXjRSenid0QKfm/images/partner_43091889328020.png?fit=max&auto=format&n=G4CXjRSenid0QKfm&q=85&s=3785384178e7d0fca473fdd035d12e98" alt="Changing external key of the Sync Users to MoEngage Data Extension" width="926" height="438" data-path="images/partner_43091889328020.png" />

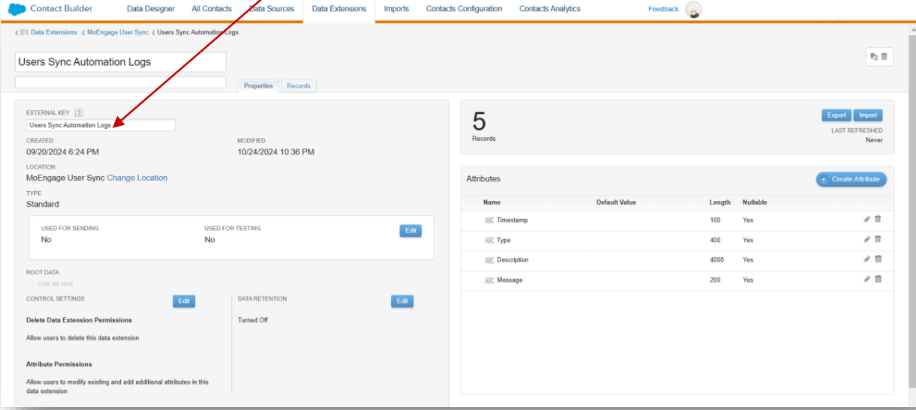
3. Change the external key of the "User Sync Automation Logs" data extension from the solution package to "User Sync Automation Logs".
   <img src="https://mintcdn.com/moengage-doc-2298-s2s-type-case-sensitive/G4CXjRSenid0QKfm/images/partner_43091841854484.png?fit=max&auto=format&n=G4CXjRSenid0QKfm&q=85&s=326ed2e35a41fc64833a94cd62438723" alt="Changing external key of the User Sync Automation Logs Data Extension" width="916" height="410" data-path="images/partner_43091841854484.png" />

## Connect your MoEngage workspace

### A. Access the credentials cloud page

On your SFMC dashboard, perform the following steps:

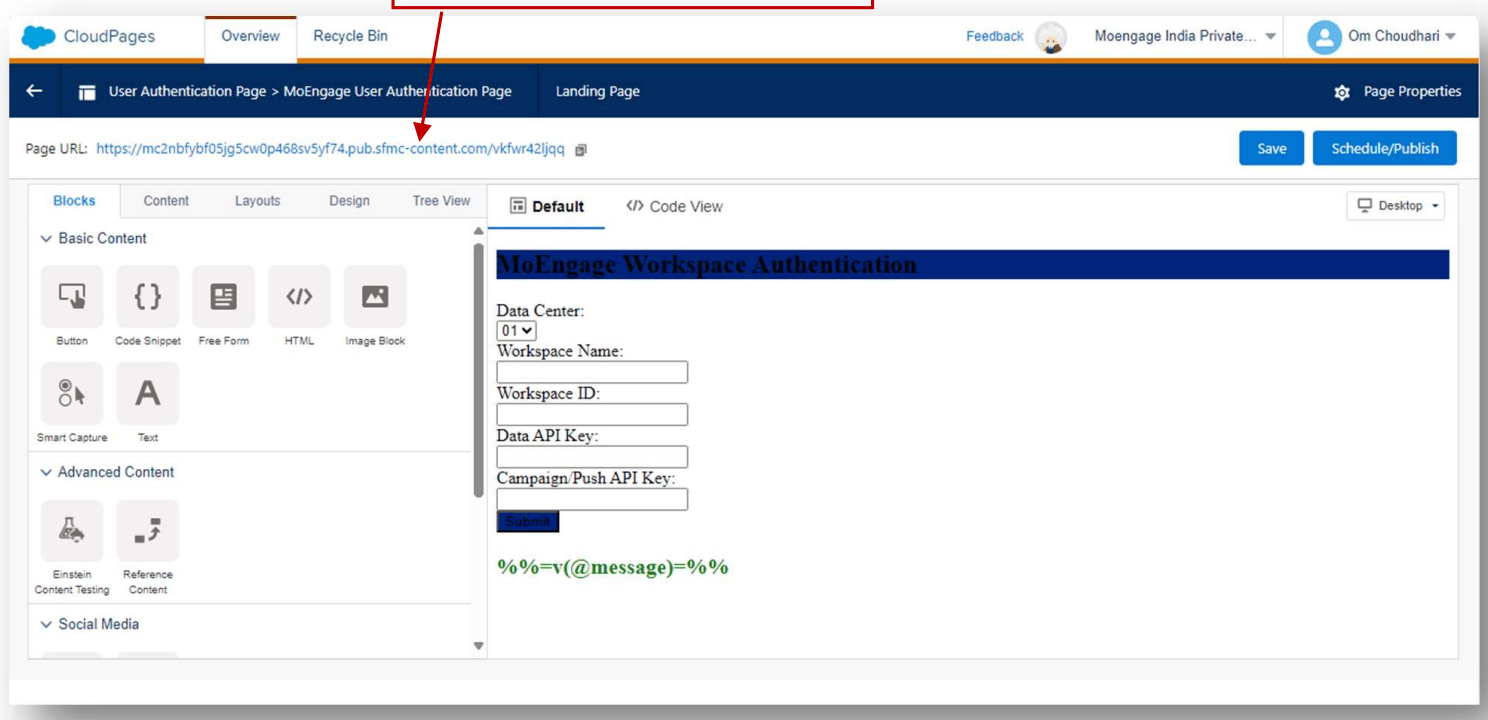
1. Navigate to "Web Studio" > "CloudPages" > "MoEngage Credentials" subfolder. Finally click on "MoEngage Authentication Page". Click Edit.

2. Click on the "Page URL" to open the Authentication Page.
   <img src="https://mintcdn.com/moengage-doc-2298-s2s-type-case-sensitive/TwBfsWYvIFdbxCDD/images/partner_36576013661716.png?fit=max&auto=format&n=TwBfsWYvIFdbxCDD&q=85&s=8793f63d68cb53e1a63f270267d2eea6" alt="Opening the MoEngage Authentication Page URL" width="1488" height="720" data-path="images/partner_36576013661716.png" />

3. Enter details of your MoEngage workspace and click Submit.

| Field                   | Value                                                                                                                                                                   |
| ----------------------- | ----------------------------------------------------------------------------------------------------------------------------------------------------------------------- |
| Data center             | Select your MoEngage data center. Refer to [Data Centers in MoEngage](https://www.moengage.com/docs/user-guide/data/key-concepts/data-centers-in-moengage) for details. |
| Workspace Name          | Enter your workspace name. It is present in the header on your MoEngage dashboard. See the screenshot below.                                                            |
| Workspace ID            | Navigate to Settings > Accounts > APIs.                                                                                                                                 |
| Data API key            | Navigate to Settings > Accounts > APIs.                                                                                                                                 |
| Campaign (Push) API Key | Navigate to Settings > Accounts > APIs.                                                                                                                                 |

<img src="https://mintcdn.com/moengage-doc-2298-s2s-type-case-sensitive/TwBfsWYvIFdbxCDD/images/partner_36576013662100.png?fit=max&auto=format&n=TwBfsWYvIFdbxCDD&q=85&s=5a755a9c7ae048cd859ed634c4fb422e" alt="Workspace name displayed in the MoEngage dashboard header" width="2716" height="294" data-path="images/partner_36576013662100.png" />

<img src="https://mintcdn.com/moengage-doc-2298-s2s-type-case-sensitive/TwBfsWYvIFdbxCDD/images/partner_36576006455316.png?fit=max&auto=format&n=TwBfsWYvIFdbxCDD&q=85&s=79161380388b8568c72827281ba2059f" alt="Locating Workspace ID, Data API key, and Campaign API key in MoEngage Settings" width="1504" height="756" data-path="images/partner_36576006455316.png" />

\[Optional] After done, you can also validate if the newly added workspace is present in the Data Extension.